
KUSANAGI 9 for AWS is a free virtual machine image that runs at high-speed WordPress and other CMSs for Amazon Web Services (AWS).
The free version of KUSANAGI can be upgraded to the "Business Edition" for business use, or to the "Premium Edition", a top-of-the-line edition equipped with a web acceleration engine.
For more information on upgrades, please refer to the following link.
KUSANAGI Editions
KUSANAGI 9 for AWS uses MariaDB Galera Server 10.3 as the standard database configuration. You can also use Amazon RDS for Aurora by changing the database connection setting in WordPress.
Recommended environment: t2.medium instance type or higher (4GB memory or more)
Introduction
This explanation starts with the assumption that the user has acquired an AWS account and has access to the AWS Management Console.
On this page we explain the following selections;
- Product: KUSANAGI 9 for AWS (AlmaLinux OS)
- Version: 9.X.XXXX on AlmaLinux OS 8
When using the Business Edition, the Premium Edition or another OS, explanations are provided in the notes.
On this page, instances are referred to as virtual machines.
How to Use KUSANAGI 9 for AWS
- Select a Virtual Machine Image from Marketplace
- Create a Virtual Machine
- Deploy the Virtual Machine
- Log In to the Virtual Machine and Prepare for Initial Setup
Select a Virtual Machine Image from Marketplace
From the AWS Marketplace, select the virtual machine image you want to launch.
Selecting the KUSANAGI 9 Virtual Machine Image
KUSANAGI 9 for AWS virtual machine images are registered in "Marketplace".
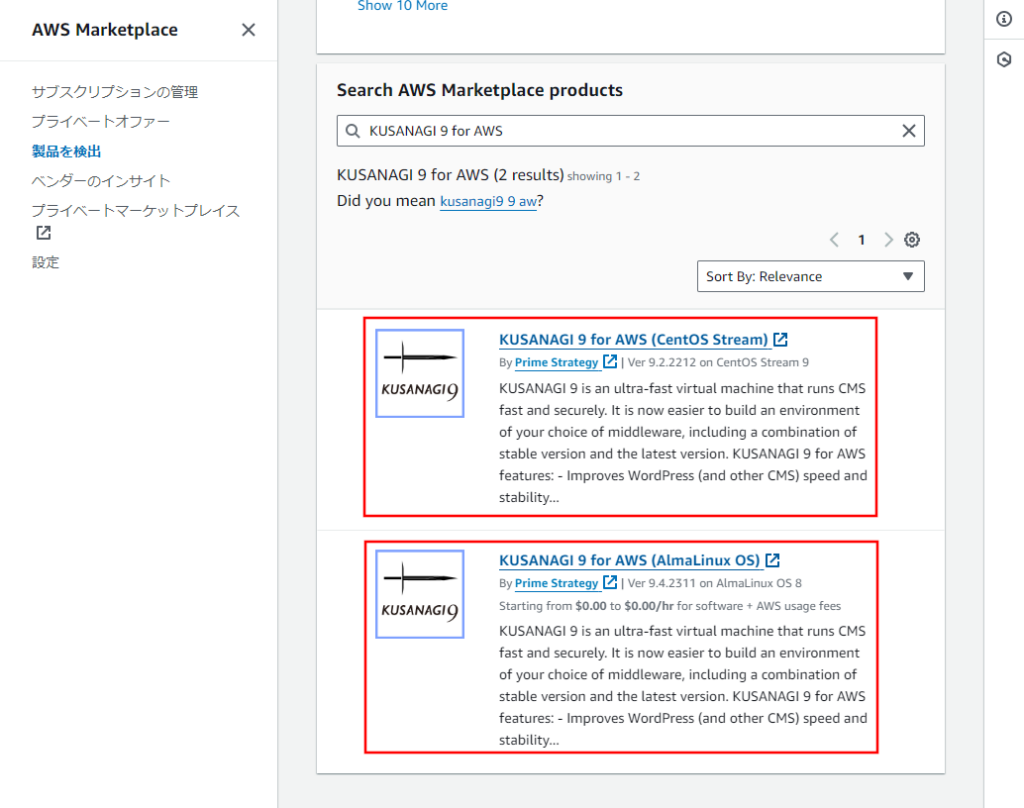
First, we will explain how to select a "KUSANAGI 9 for AWS" virtual machine image from Marketplace.
Enter "KUSANAGI 9 for AWS" in the search field at the top of the AWS Management Console and select "KUSANAGI 9 for AWS (AlmaLinux OS)".
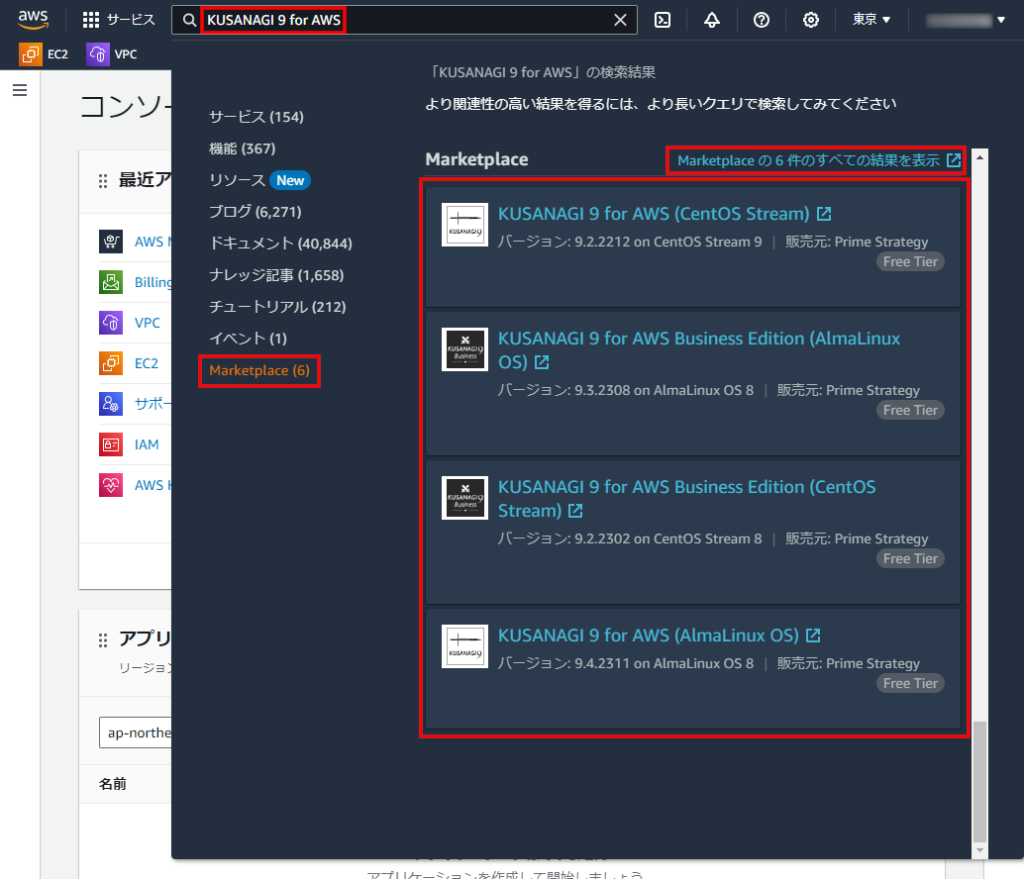
- If it is not visible, click the "Display all search results (no. of items) in Marketplace" link and then select "KUSANAGI 9 for AWS (AlmaLinux OS)".
If you would like to use the Business Edition or Premium Edition or another OS, please refer to the chart below.
| Edition | OS | Product |
|---|---|---|
| Free Version | AlmaLinux OS | KUSANAGI 9 for AWS (AlmaLinux OS) |
| CentOS Stream | KUSANAGI 9 for AWS (CentOS Stream) | |
| Business Edition | AlmaLinux OS | KUSANAGI 9 for AWS Business Edition (AlmaLinux OS) |
| CentOS Stream | KUSANAGI 9 for AWS Business Edition (CentOS Stream) | |
| Premium Edition | AlmaLinux OS | KUSANAGI 9 for AWS Premium Edition (AlmaLinux OS) |
| CentOS Stream 8 | KUSANAGI 9 for AWS Premium Edition (CentOS Stream 8) |
"KUSANAGI 9 for AWS (AlmaLinux OS)" will be displayed in "AWS Marketplace", so click "Continue to Subscribe".
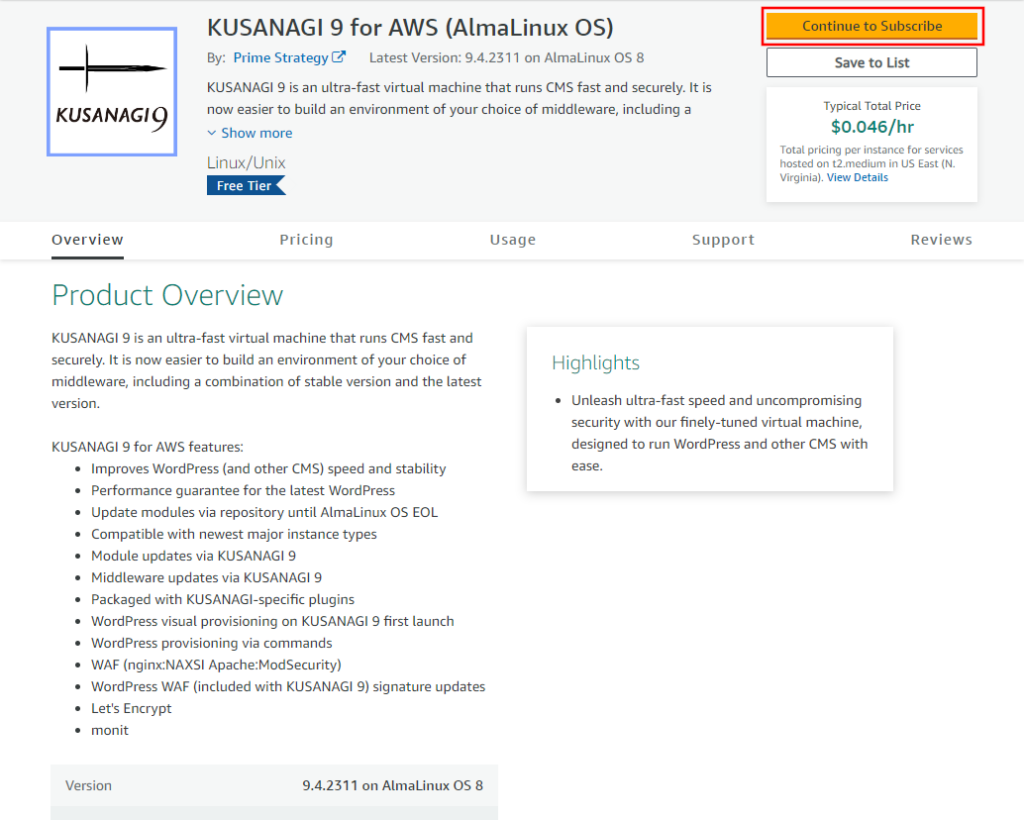
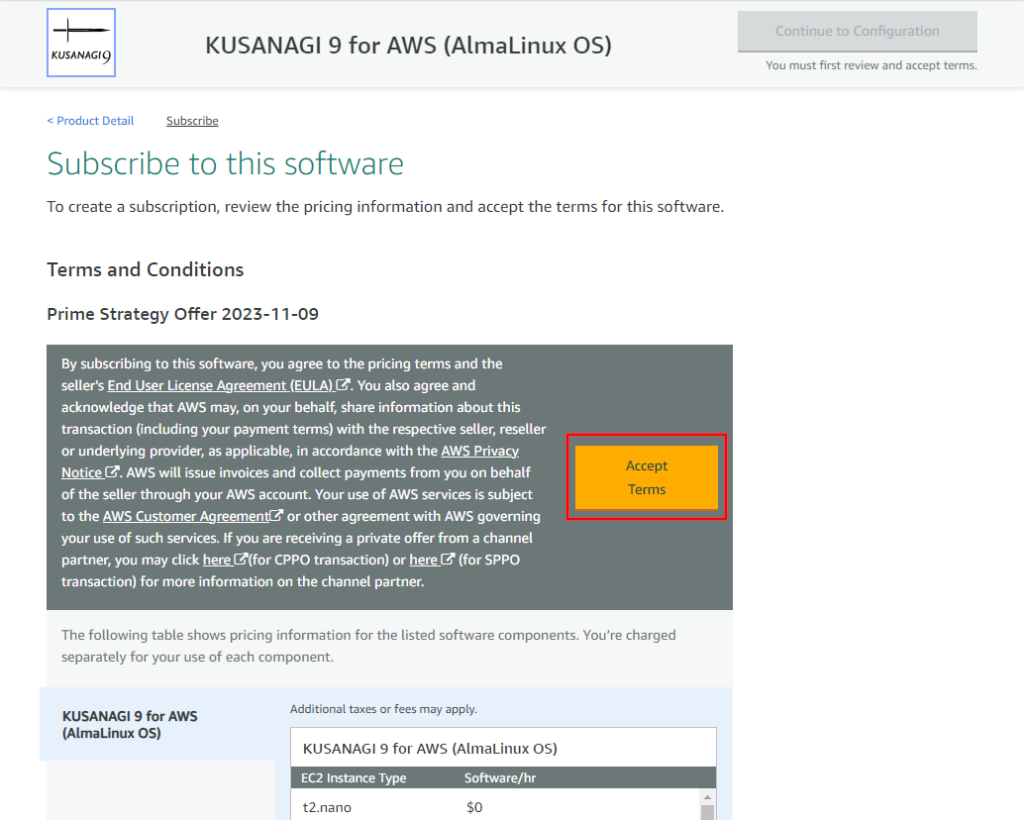
Apply to use the software. Check the Terms and Conditions and if you agree, click "Accept Terms".
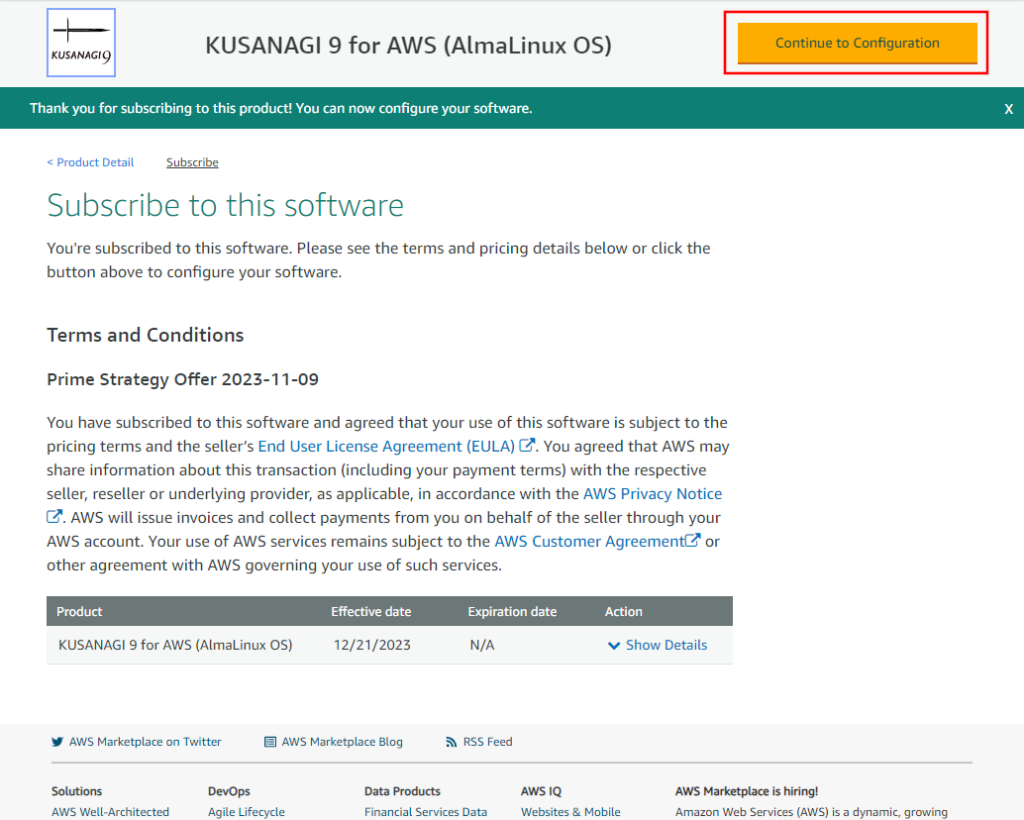
Click "Continue to Configuration" to proceed to the configuration screen.
Choose the OS version to be used.
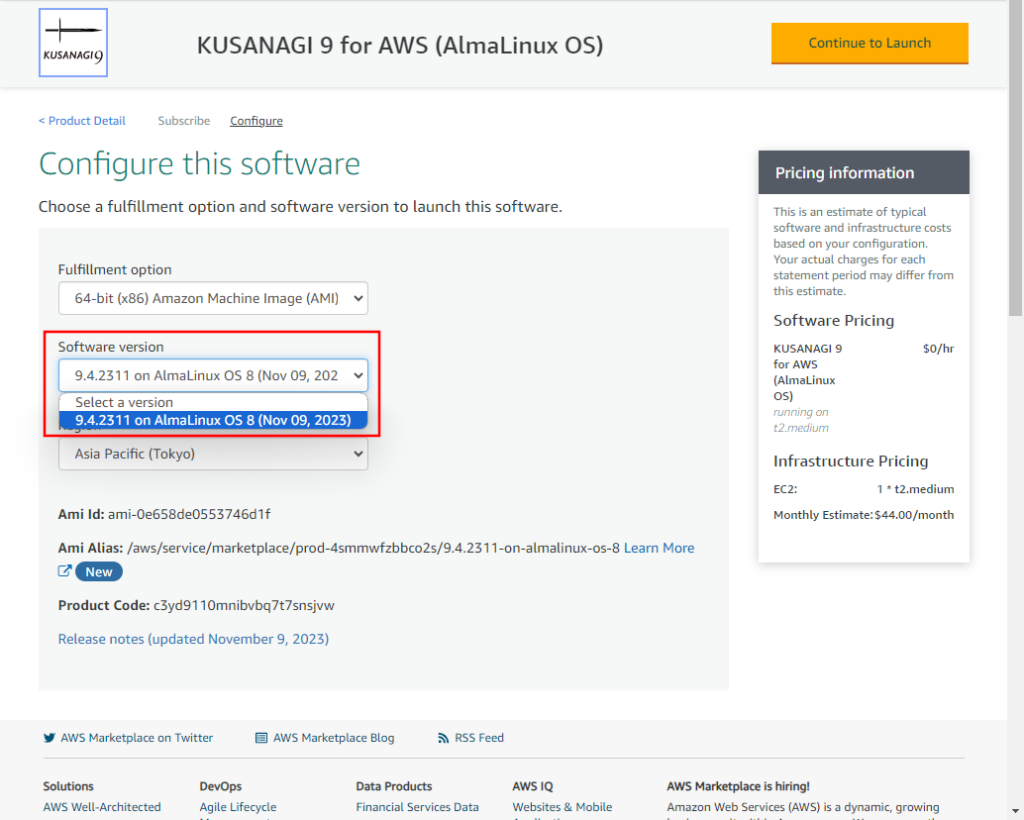
The available OS will change depending on the product you selected. Please see below for available OS.
| Product | OS |
|---|---|
| KUSANAGI 9 for AWS (AlmaLinux OS) | AlmaLinux OS 8 AlmaLinux OS 9 |
| KUSANAGI 9 for AWS (CentOS Stream) | CentOS Stream 8 CentOS Stream 9 |
| KUSANAGI 9 for AWS Business Edition (AlmaLinux OS) | AlmaLinux OS 8 AlmaLinux OS 9 |
| KUSANAGI 9 for AWS Business Edition (CentOS Stream) | CentOS Stream 8 CentOS Stream 9 |
| KUSANAGI 9 for AWS Premium Edition (AlmaLinux OS) | AlmaLinux OS 8 AlmaLinux OS 9 |
| KUSANAGI 9 for AWS Premium Edition (CentOS Stream 8) | CentOS Stream 8 |
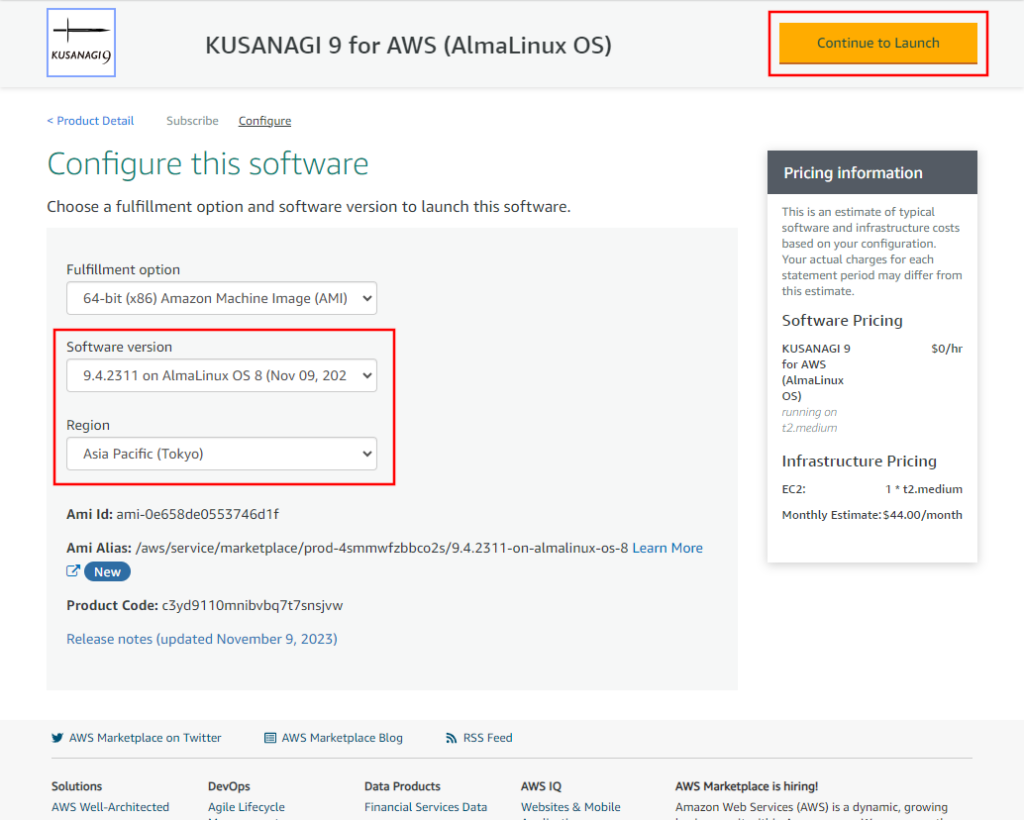
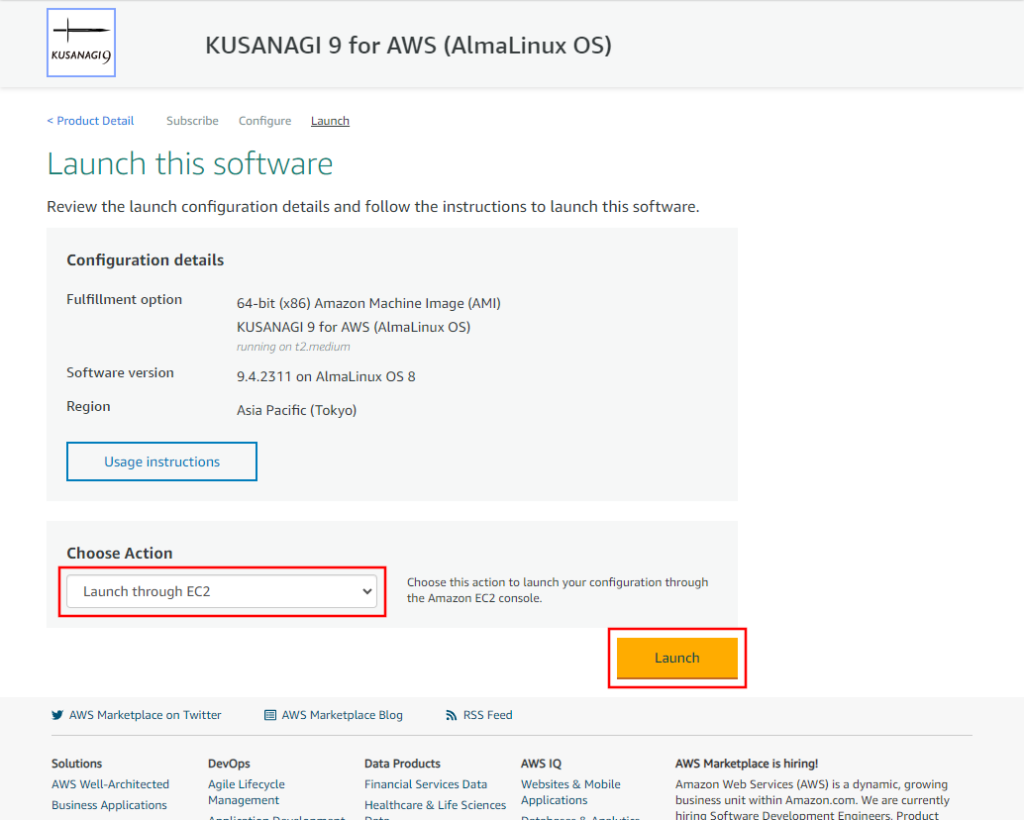
After double-checking the software version and region, click "Continue to Launch".
In the Launch screen, select "Launch through EC2" under "Choose Action" and then click "Launch".
Create a Virtual Machine
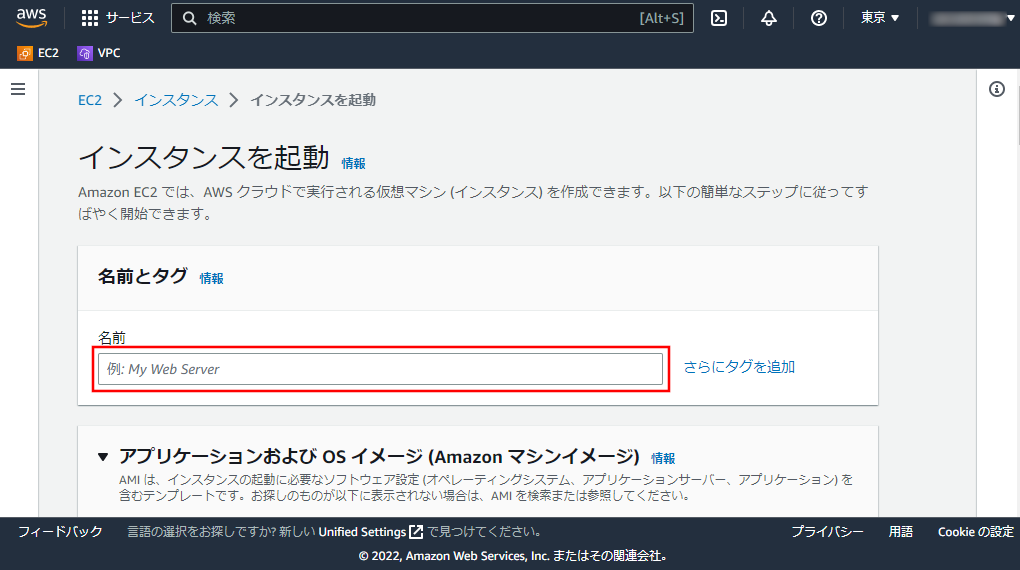
Name and Tags
Choose a name for the virtual machine you want to create.
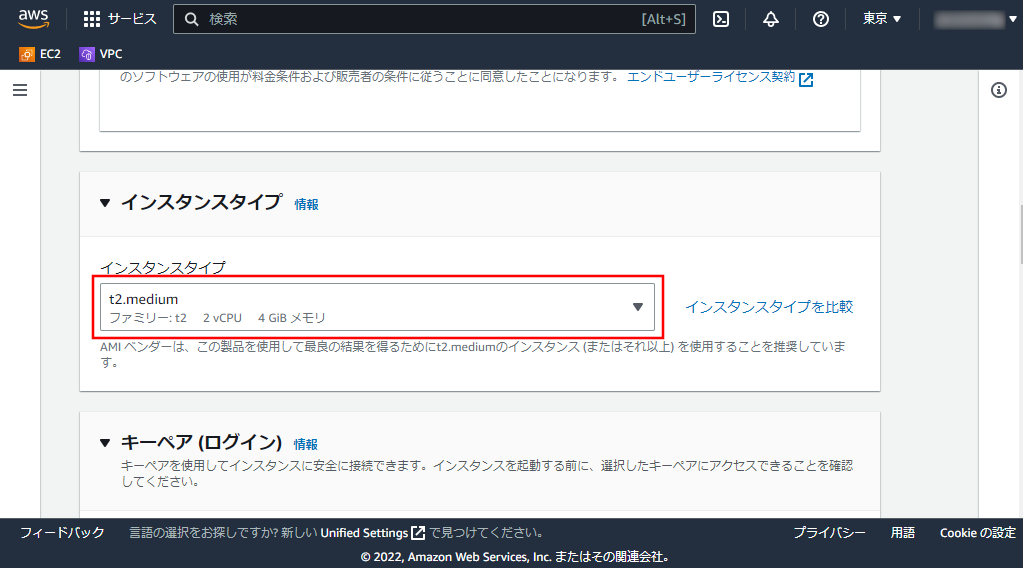
Instance Type
Select the instance type (KUSANAGI recommends an environment of 4GiB memory or more).
By default, "t2.medium" (4 GiB memory) will be selected.
Key Pair for Login
Select a key pair.
Click on the key pair if it already exists, or "Create a New Key Pair" if it doesn't.
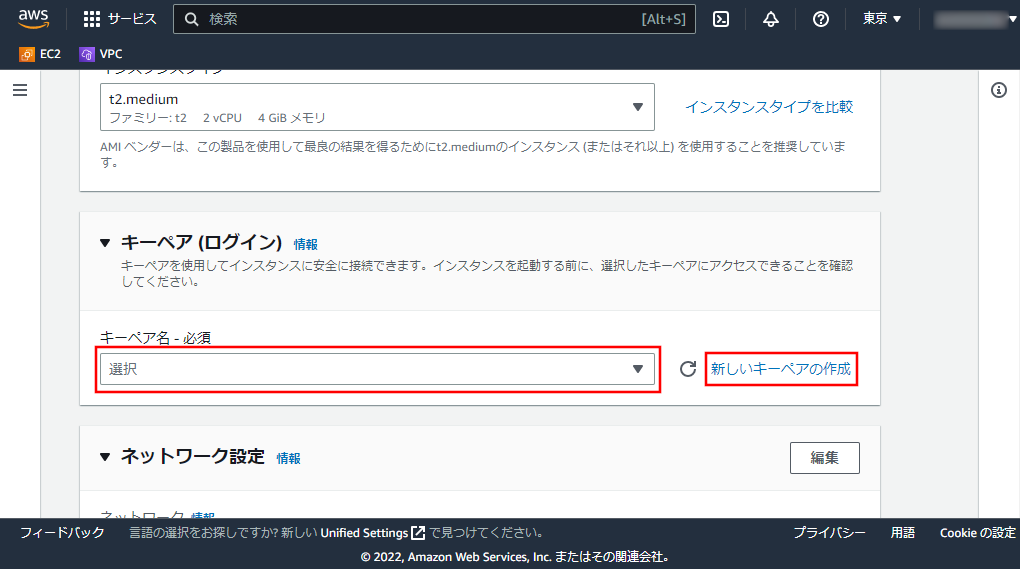
We will now explain how to create a new key pair.
If you already have a key pair, please skip to "Network Settings".
When the "Create Key Pair" window appears, enter your chosen key pair name in the "Key Pair Name" field and click "Create Key Pair".
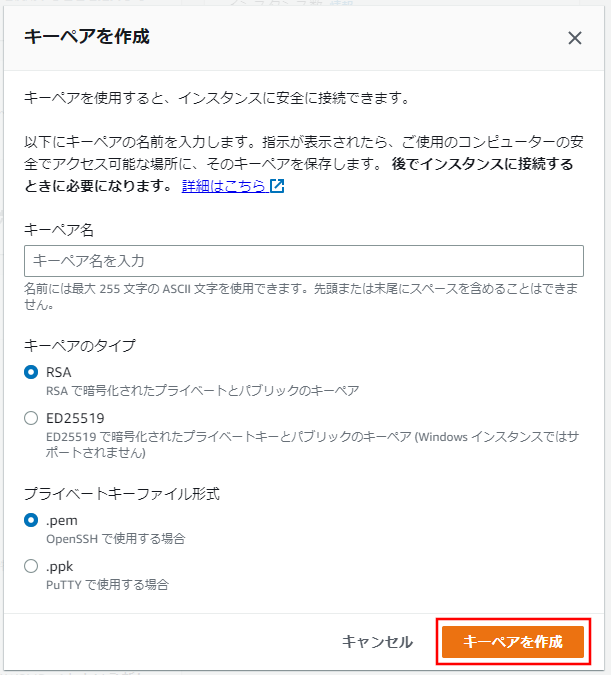
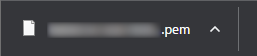
The key file will be downloaded, so save it to your PC.
The key file will be used when logging into the virtual machine (explanation later).
Network Settings
Set-up the firewall in the network settings. For additional security, check "Allow SSH traffic from", and select "Own IP Address" from the pull-down list. Then, the IP address you are currently accessing will be set.
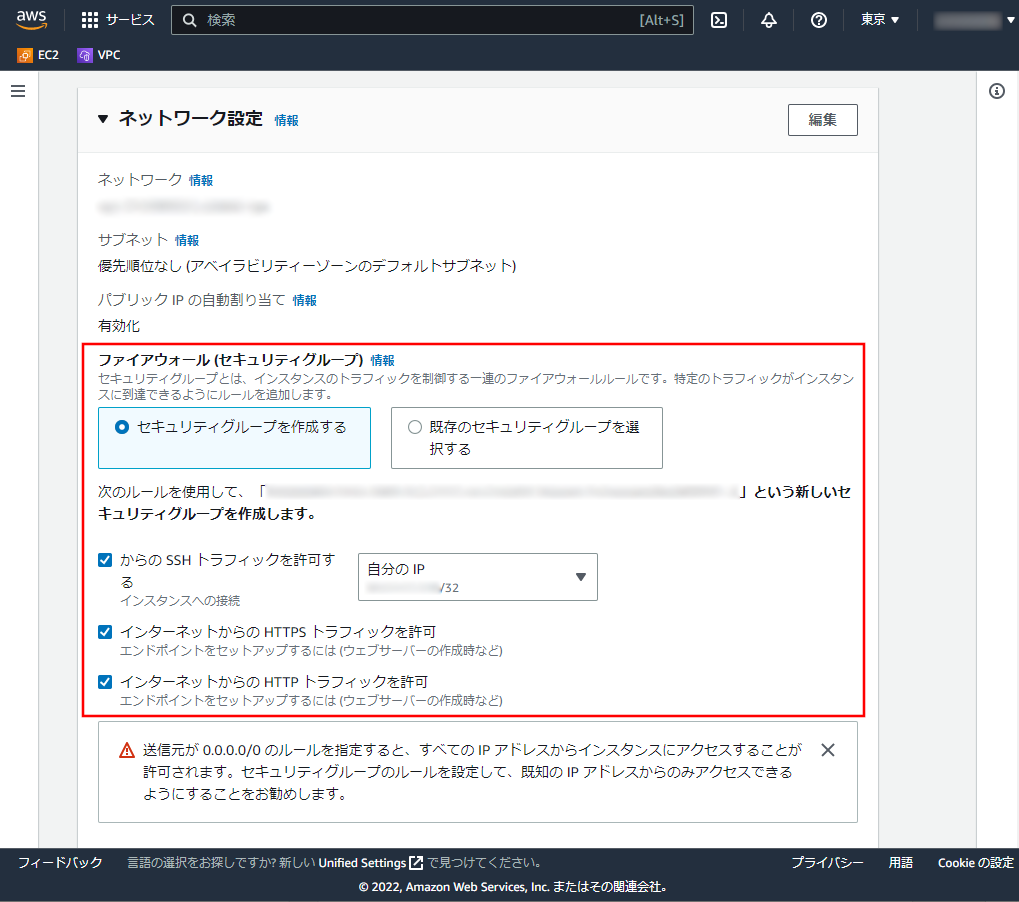
- If the connection IP is limited to a specific range, select "Custom" from the pull-down list and set the CIDR settings. If you are unable to specify the IP range, add a rule for SSH on "Own IP Address" from the AWS Management Console each time, and delete the rule when you are finished.
KUSANAGI 9 for AWS has the following ports open by default.
- Ports open for all products
- SSH(TCP : 22)
- HTTP(TCP : 80)
- HTTPS(TCP : 443)
- Ports opened in KUSANAGI 9 for AWS / KUSANAGI 9 for AWS Business Edition / KUSANAGI 9 for AWS Premium Edition
- HTTP/3(UDP : 443)
- Ports opened in KUSANAGI 9 for AWS Premium Edition
- WEXAL(TCP : 61000)
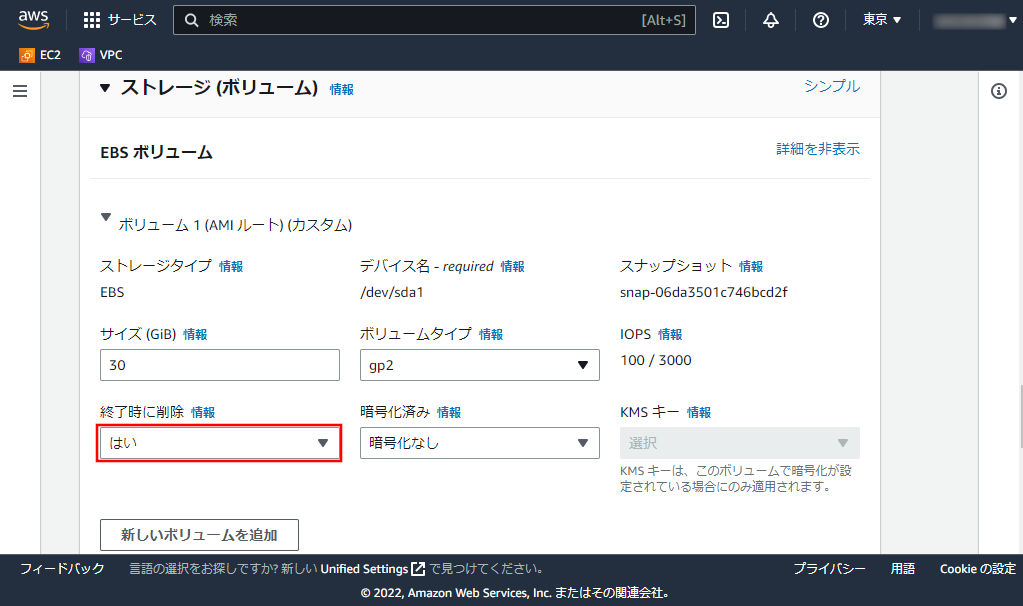
Storage Settings
This section explains the storage settings. Click on "Advanced" in the upper right corner.
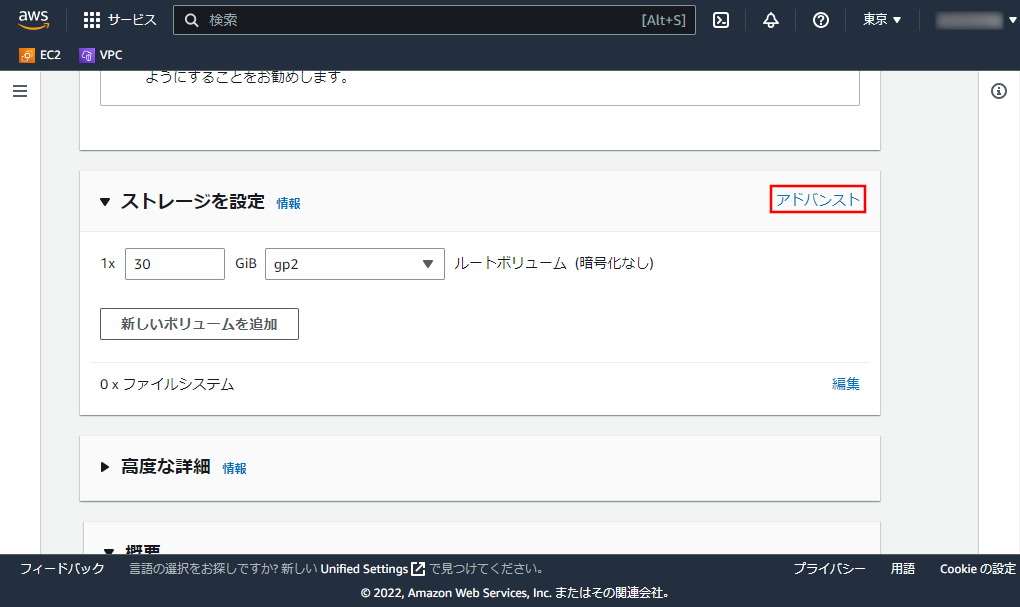
The advanced storage settings will appear, set the deletion option to "Yes" when closing down. With this setting, the storage will also be automatically deleted when the virtual machine is closed.
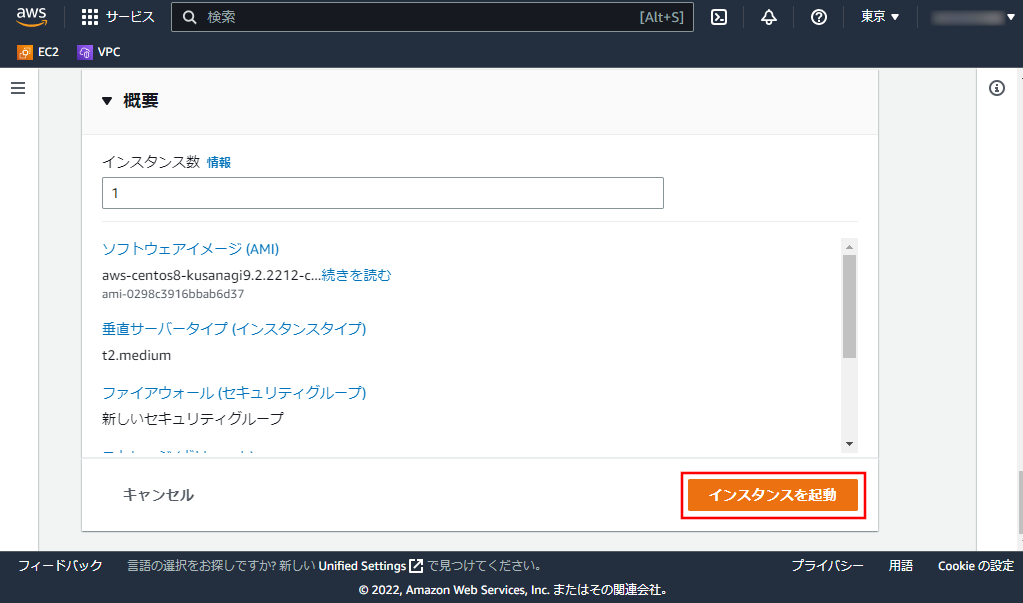
Launching the Virtual Machine
Click "Start-Up Instance" at the bottom of the screen.
Deploy the Virtual Machine
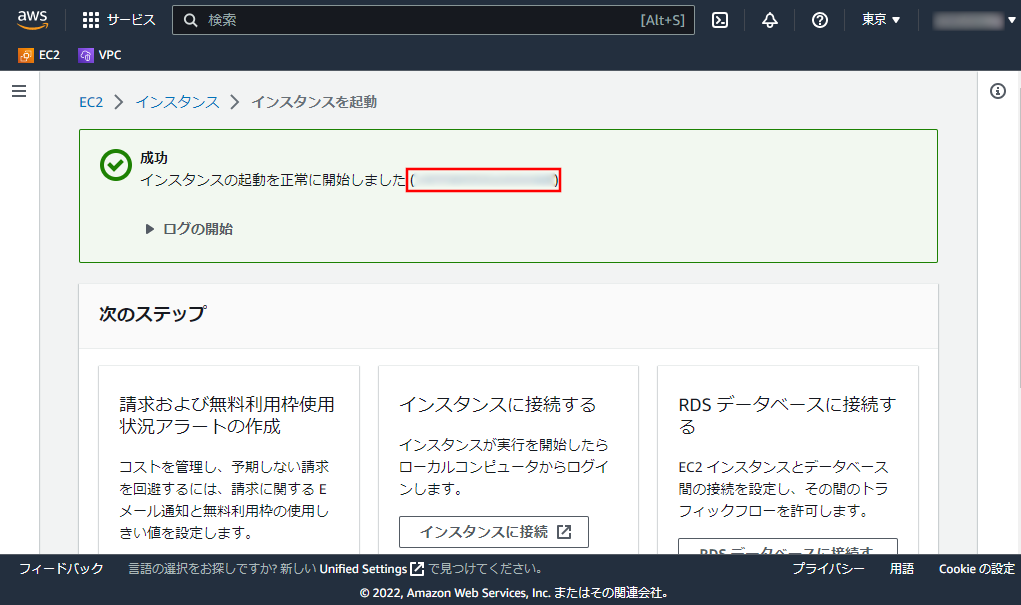
Deployment Complete
The screen will switch to "Creation Status" and display "Success" if it has been successfully activated. The Instance ID will also be displayed there, so click on it. The screen will go to the virtual machine information page.
On the Instance page, when "Status Check" displays as "Initializing ...", this is confirmation that the virtual machine is being created.
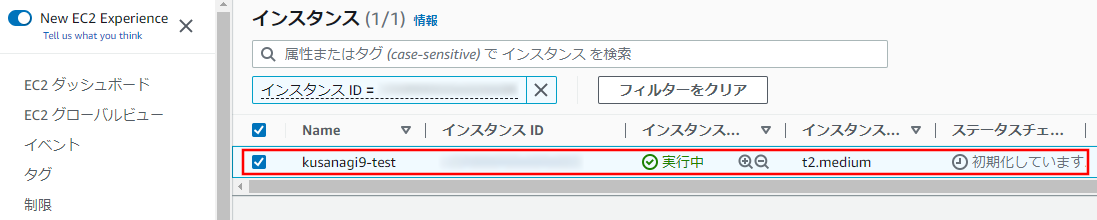
After some time, "Status Check" will change to "Completed Status Check 2/2". The creation of the virtual machine is now complete.

- When the "Instance Status" displays as "Running...," this is confirmation that it is up and running.
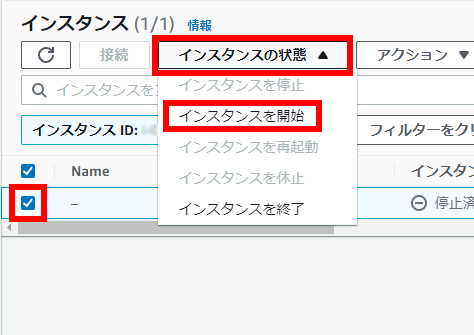
Restarting the virtual machine
When you create a virtual machine, it will launch automatically. If the virtual machine stops, click the "Start-Up Instance" button on the "Instance Status" menu to re-start it.
Elastic IP (fixed IP) Settings
The IP assigned for the EC2 virtual machine that has been created is a dynamic assignment that changes every time it's restarted. If you want the IP address to be fixed, go to "Elastic IP" to assign and link an IP address.
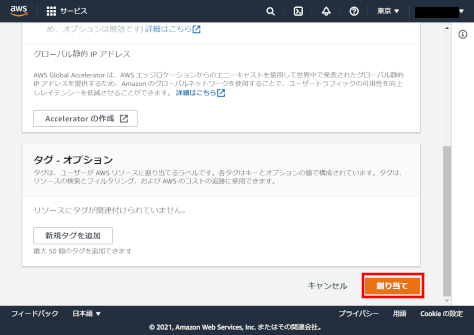
From the EC2 dashboard on the AWS Management Console, click "Network & Security" -> "Elastic IP" menu, and then click "Assign Elastic IP Address". The screen will go to "Assign Elastic IP Address".

Click "Assign" to assign an IP address.
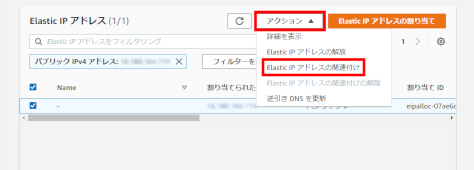
With the assigned IP address selected, select "Link Elastic IP Address" from the "Action" pull-down, and in the "Instance" field, specify the Instance ID to which you want to apply the IP address.
Log In to the Virtual Machine and Prepare for Initial Setup
The following section describes how to prepare for logging in to the virtual machine and performing the initial setup.
Logging In to the Virtual Machine
After selecting the virtual machine you created, check the virtual machine information at the bottom of the page. Use your "Public IPv4 Address" (or "Public IPv4 DNS") when logging in.
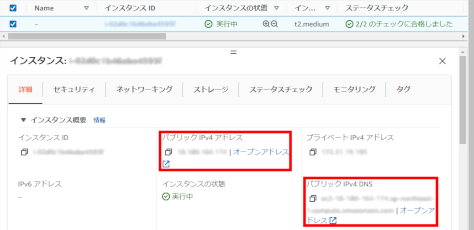
Log into the virtual machine using the "ssh" command. The information you will need is the "Public IPv4 address" (or "Public IPv4 DNS") and the full path of the private key file downloaded under "VM Deploy" -> "Key Pair (Login)". The user name is "ec2-user". The user name will change depending on the product and OS selected. Please refer to the chart below.
| Product | OS | User Name |
|---|---|---|
| KUSANAGI 9 for AWS (AlmaLinux OS) KUSANAGI 9 for AWS Business Edition (AlmaLinux OS) KUSANAGI 9 for AWS Premium Edition (AlmaLinux OS) | - | ec2-user |
| KUSANAGI 9 for AWS (CentOS Stream) KUSANAGI 9 for AWS Business Edition (CentOS Stream) | CentOS Stream 8 | centos |
| CentOS Stream 9 | ec2-user | |
| KUSANAGI 9 for AWS Premium Edition (CentOS Stream 8) | - | centos |
| KUSANAGI for AWS KUSANAGI for AWS Business Edition KUSANAGI for AWS Premium Edition | - | centos |
# ssh ec2-user@(public IPv4 address) -i (full path to private key file)If you want to log in using a password or using an SSH client on Windows, please refer to the link below.
Log in to KUSANAGI 9 with Windows "ssh"
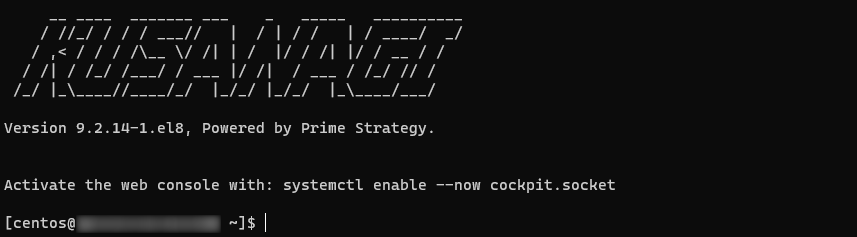
If the log-in is successful, you will see the following screen.
Switching to the "root" User
To switch to the "root" user, enter the following.
$ sudo su -Confirm that you have switched to the "root" user.
[root@<hostname> ~]#If it ends with #, the switch has been made to the "root" user.
For further steps, please follow the instructions below.
If you are using KUSANAGI 9 for AWS, please refer to the link below.
KUSANAGI 9 Quick Start
If you are using KUSANAGI 9 for AWS Business Edition or KUSANAGI 9 for AWS Premium Edition, please refer to the following link.
Web Setup for KUSANAGI 9 Business Edition and Premium Edition

