
KUSANAGI 9 for GCP is a free virtual machine image that runs at high-speed WordPress and other CMSs for Google Cloud Platform.
The free version of KUSANAGI can be upgraded to the "Business Edition" for business use, or to the "Premium Edition", a top-of-the-line edition equipped with a web acceleration engine.
For more information on upgrades, please refer to the following link.
KUSANAGI Editions
Recommended environment: 3.5 GB memory or more.
Introduction
This explanation starts with the assumption that the user has acquired a Google account and has access to the Google Cloud Platform portal screen.
On this page we explain the following selections;
- Product: KUSANAGI 9 for GCP (AlmaLinux OS 8)
When using the Business Edition, the Premium Edition or another OS, explanations are provided in the notes.
How to use KUSANAGI 9 for GCP
- Select a Virtual Machine Image from Marketplace
- Create a Virtual Machine
- Deploy the Virtual Machine
- Log In to the Virtual Machine and Prepare for Initial Setup
Select a Virtual Machine Image from Marketplace
Select the virtual machine image you want to launch from GCP Marketplace.
Selecting the KUSANAGI 9 Virtual Machine Image
"KUSANAGI 9 for GCP" virtual machine images are registered in "Marketplace". First, we will explain how to select a "KUSANAGI 9 for GCP" virtual machine image from Marketplace.
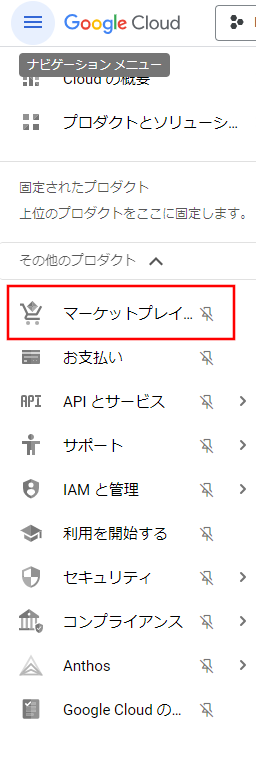
Go to the Google Cloud Platform page and select Marketplace from the menu on the left.
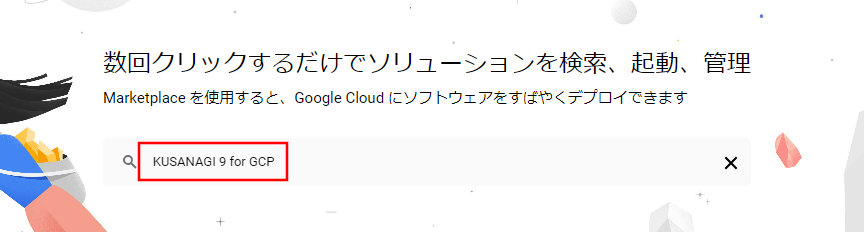
From the Marketplace screen, enter "KUSANAGI 9 for GCP".
When the results show up, select "KUSANAGI 9 for GCP (AlmaLinux OS 8)".
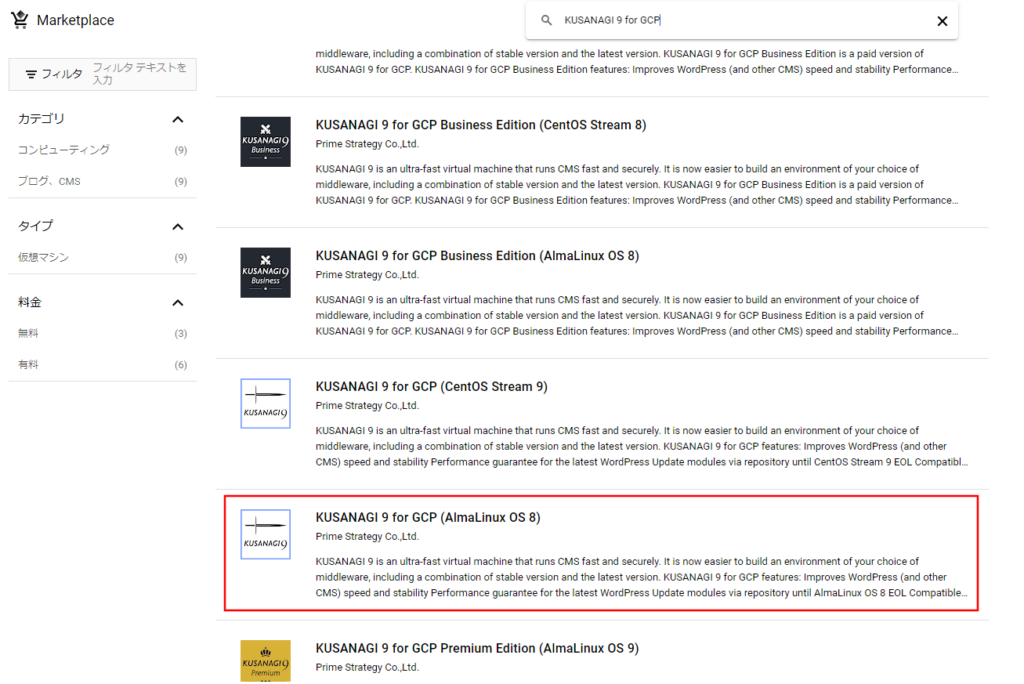
If you would like to use the Business Edition or Premium Edition or another OS, please refer to the chart below.
| Edition | OS | Product |
|---|---|---|
| Free Version | AlmaLinux OS 8 | KUSANAGI 9 for GCP (AlmaLinux OS 8) |
| AlmaLinux OS 9 | KUSANAGI 9 for GCP (AlmaLinux OS 9) | |
| CentOS Stream 8 | KUSANAGI 9 for GCP (CentOS Stream 8) | |
| CentOS Stream 9 | KUSANAGI 9 for GCP (CentOS Stream 9) | |
| Business Edition | AlmaLinux OS 8 | KUSANAGI 9 for GCP Business Edition (AlmaLinux OS 8) |
| AlmaLinux OS 9 | KUSANAGI 9 for GCP Business Edition (AlmaLinux OS 9) | |
| CentOS Stream 8 | KUSANAGI 9 for GCP Business Edition (CentOS Stream 8) | |
| Premium Edition | AlmaLinux OS 8 | KUSANAGI 9 for GCP Premium Edition (AlmaLinux OS 8) |
| AlmaLinux OS 9 | KUSANAGI 9 for GCP Premium Edition (AlmaLinux OS 9) | |
| CentOS Stream 8 | KUSANAGI 9 for GCP Premium Edition (CentOS Stream 8) |
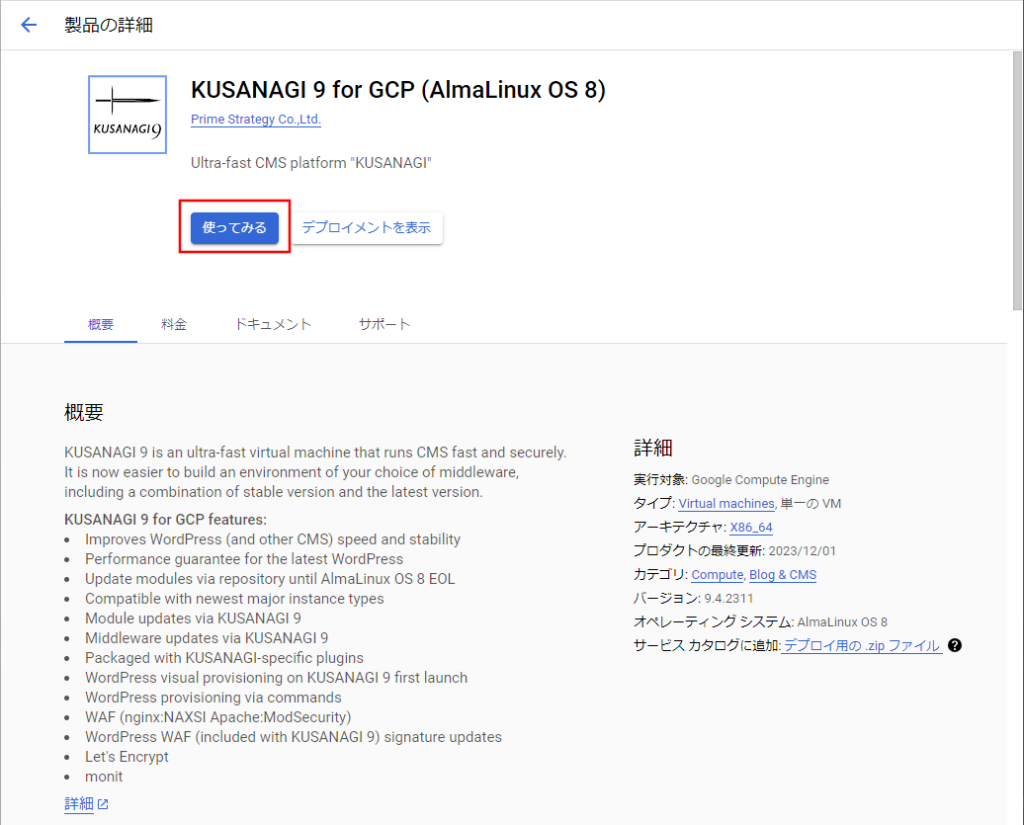
When you see the "Product Details" screen, click "Get Started".
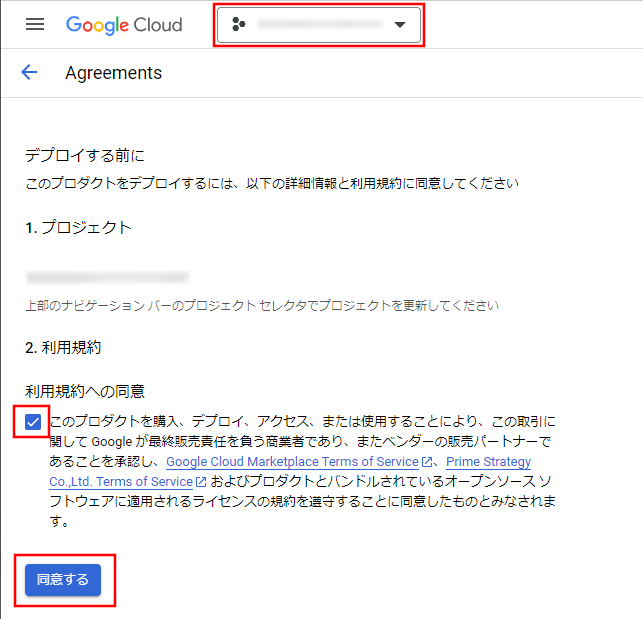
- If you have already accepted the terms on the "Agreements" screen, click "Start Operation" when it appears.
Select the project you wish to deploy from the top of the screen. After reading the terms, check the box for terms of use, and click "Agree".
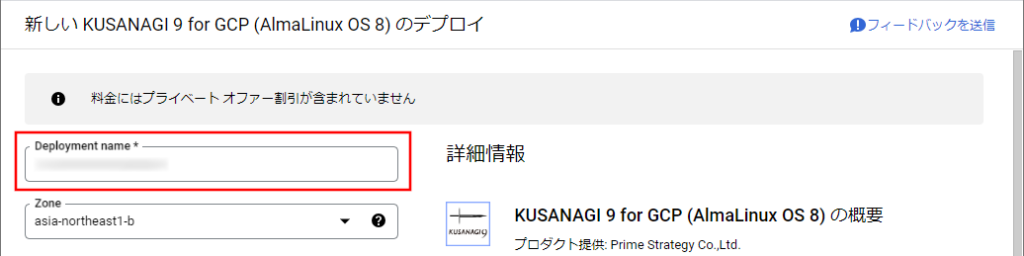
Create a Virtual Machine
General Settings
Enter the deployment name.
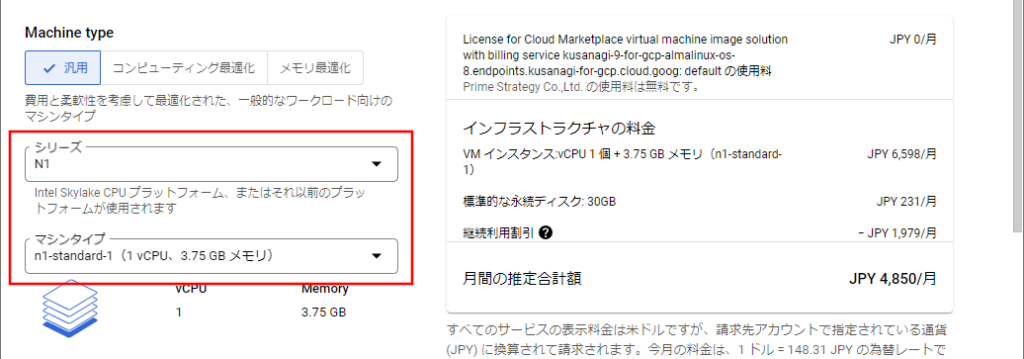
Machine Type
Select the machine type (KUSANAGI recommends an environment of 3.5 GB memory or more). By default, "n1-standard-1" (3.75 GiB of memory) will be selected.
Boot Disk
Setting up the boot disk. Please set up any necessary items.

Networking
Network settings. Please set up any necessary items.
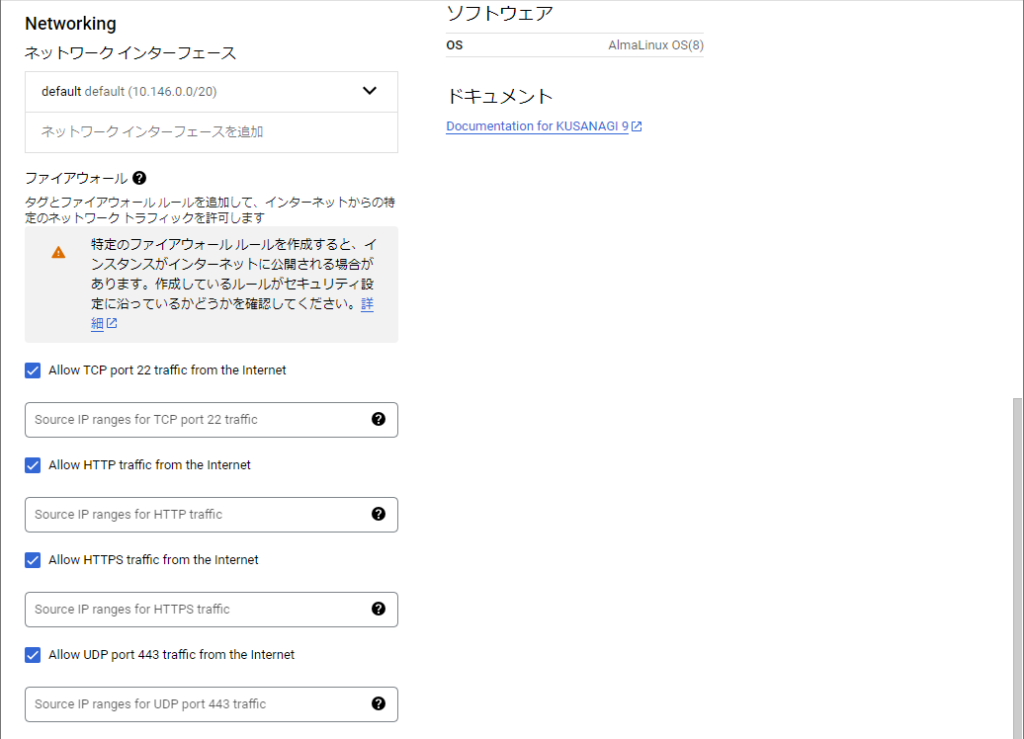
KUSANAGI 9 for GCP has the following ports open by default.
- Ports open for all products
- SSH(TCP : 22)
- HTTP(TCP : 80)
- HTTPS(TCP : 443)
- Ports opened in KUSANAGI 9 for GCP / KUSANAGI 9 for GCP Business Edition / KUSANAGI 9 for GCP Premium Edition
- HTTP/3(UDP : 443)
- Ports opened in KUSANAGI 9 for GCP Premium Edition
- WEXAL(TCP : 61000)
Depending on the security requirements, we recommend changing the settings to make them more secure, such as implementing IP restrictions.
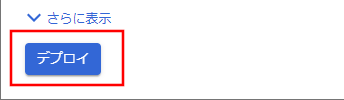
Deploying a Virtual Machine
Click "Deploy" at the bottom of the screen.
Deploy the Virtual Machine
Deployment Complete
When deployment is complete, the following screen will appear. Deployment is complete when the message "(Deployment name) has been deployed" is shown.
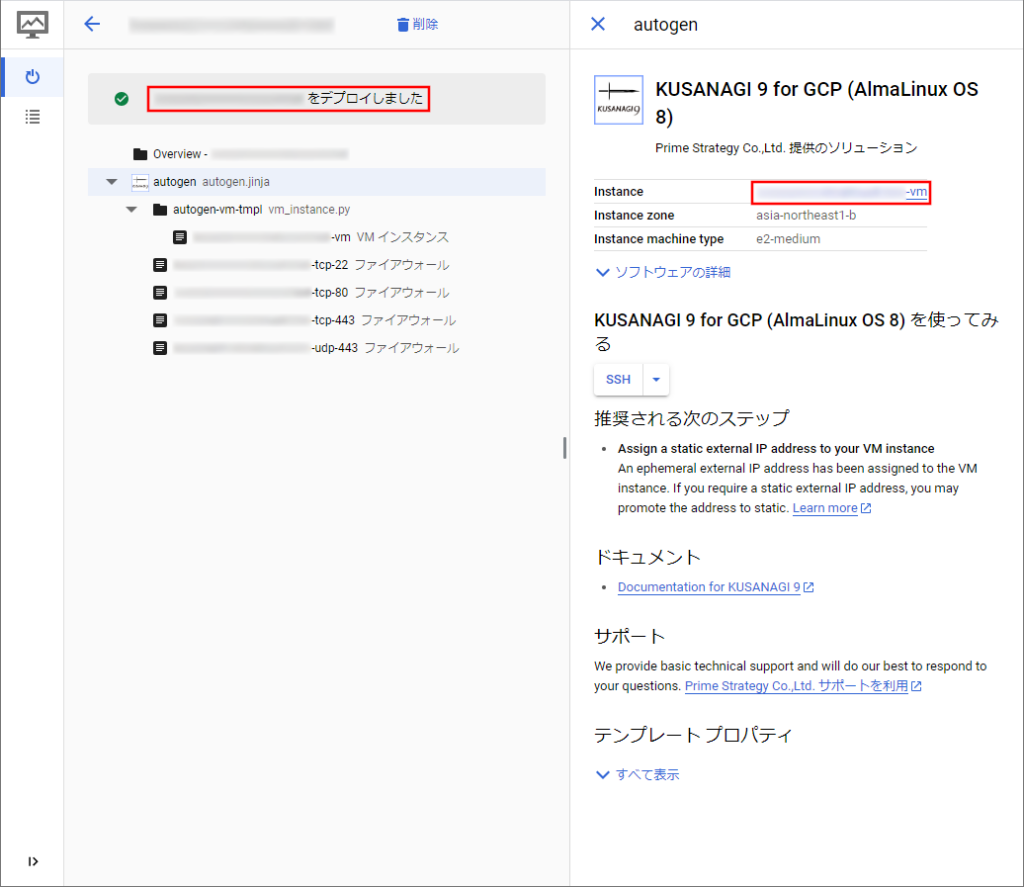
To go to the virtual machine page you created, click on the virtual machine name in "Instance".
Checking the Deployment Results
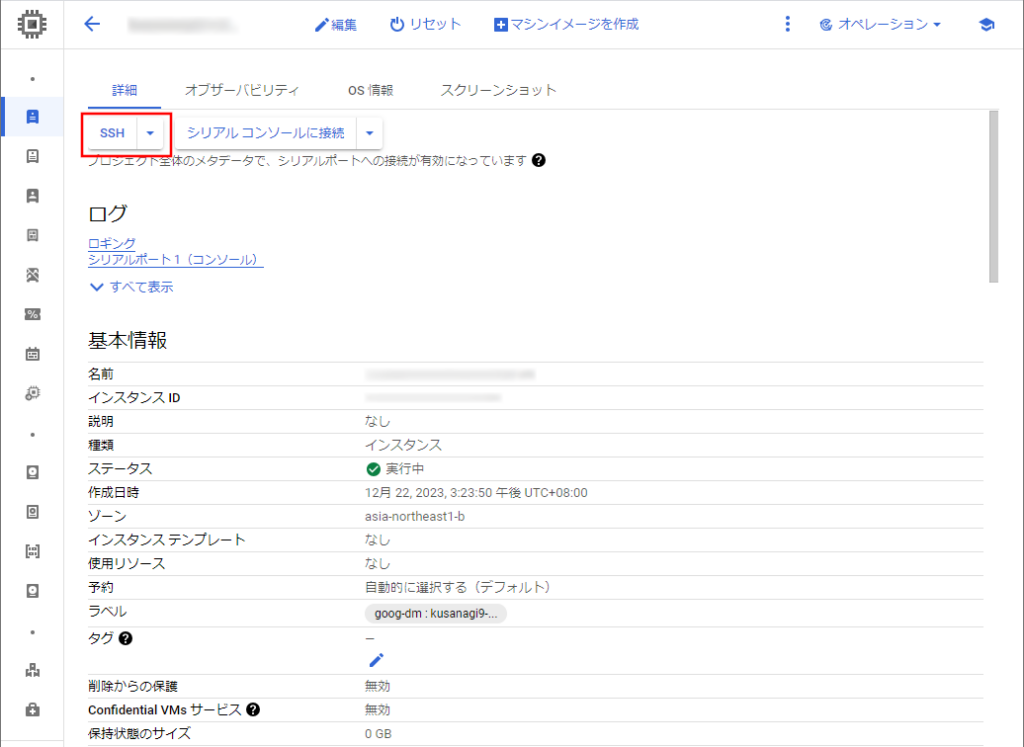
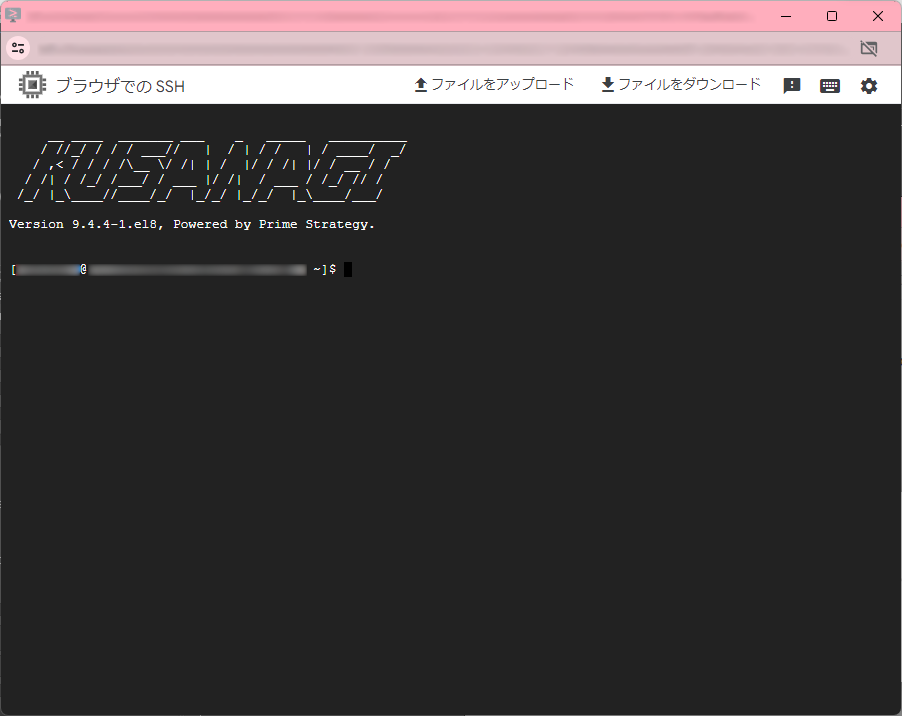
The virtual machine page will display the virtual machine settings. You can connect to the virtual machine by clicking the "SSH" button at the top.
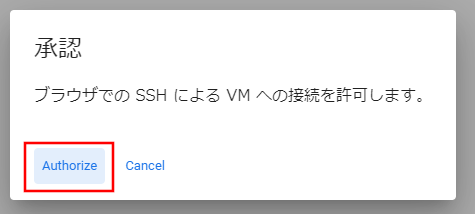
If an authorization dialog appears, click the "Authorize" button and proceed.
If the SSH connection is successful, the following window will appear.
Next, we will describe how to set up a virtual machine for a user other than the user who logged in with GCP.
Registering a New User to the Virtual Machine
The following is an example of how to create a private key and a public key for "ssh", using the "ssh-keygen" command.
Creating a Private Key and a Public Key for "ssh"
The following is an example of how to create a private key and a public key for "ssh", using the "ssh-keygen" command.
Example: (key file name is "id_rsa")
# ssh-keygen -q -t rsa -b 4096 -C '""' -N '""' -f id_rsa
Registering a New User to the Virtual Machine
On the virtual machine page, click the "Edit" button at the top to see the "Edit" screen.

On the virtual machine "Edit" screen, click "Add Item" under the "Security and Access" -> "SSH Authentication Key" section.
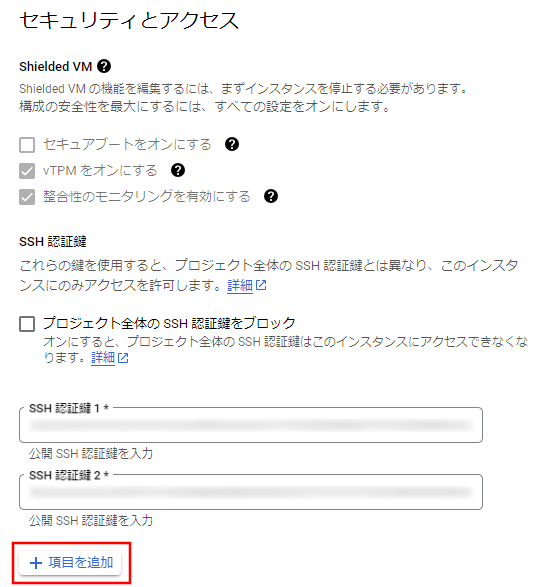
When the "Add Item" box opens, paste the contents of the public key file you just created ("id_rsa.pub" in the example). Then enter the user name as well, with a space after the pasted content ("gcp-user" in the example).

After entering the information, click the "Save" button at the bottom of the screen.

Making a Note of the External IP Address
An external IP address will be required to log in through "ssh". In the middle of the virtual machine page there is a section called "Network Interface'', and within that there is an item called "External IP Address'', so please make a note of this address.

Log In to the Virtual Machine and Prepare for Initial Setup
The following section describes how to prepare for logging in to the virtual machine and performing the initial setup.
Logging In to the Virtual Machine
As explained earlier, with GCP, there are two ways to login to the virtual machine.
- Log in using the "SSH" button on the virtual machine page
- Log in using the "ssh" command
The following describes what information you will need to log in to the virtual machine using the "ssh" command, and the same information will be required to log in using the "SSH" button. To log in to the virtual machine, you need the full path to the private key file you created in "Registering a new user to the virtual machine", the user name you set, and the external IP address that you had written down.
# ssh (user name)@(external IP address) -i (full path to private key file)If you are logging in using an SSH client on Windows, please refer to the link below.
Log in to KUSANAGI 9 with Windows "ssh"
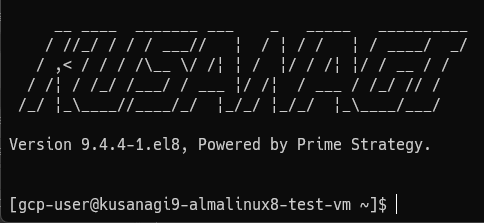
If the log-in is successful, you will see the following screen.
Switching to the "root" User
To switch to the "root" user, enter the following.
$ sudo su -Confirm that you have switched to the "root" user.
[root@<hostname> ~]#If it ends with #, the switch has been made to the "root" user.
For further steps, please follow the instructions below.
If you are using KUSANAGI 9 for GCP, please refer to the link below.
KUSANAGI 9 Quick Start
If you are using KUSANAGI 9 for GCP Business Edition or KUSANAGI 9 for GCP Premium Edition, please refer to the link below.
Web Setup for KUSANAGI 9 Business Edition and Premium Edition

