
KUSANAGI 9 for Microsoft Azure is a free virtual machine image that runs at high-speed WordPress and other CMSs for Microsoft Azure.
The free version of KUSANAGI can be upgraded to the "Business Edition" for business use, or to the "Premium Edition", a top-of-the-line edition equipped with a web acceleration engine.
For more information on upgrades, please refer to the following link.
KUSANAGI Editions
Recommended environment: B2s or A2 v2 instance or higher (memory 4GB or more)
Introduction
This explanation starts with the assumption that the user has acquired a Microsoft account and a Microsoft Azure account, and can also access the Microsoft Azure portal screen.
On this page we explain the following selections;
- Service: KUSANAGI 9 for Microsoft Azure
- Plan: KUSANAGI 9 for Microsoft Azure on AlmaLinux OS 8
When using the Business Edition, the Premium Edition or another OS, explanations are provided in the notes.
How to use KUSANAGI 9 for Microsoft Azure
- Select a Virtual Machine Image from Marketplace
- Create a Virtual Machine
- Deploy the Virtual Machine
- Log In to the Virtual Machine and Prepare for Initial Setup
Select a Virtual Machine Image from Marketplace
Select the virtual machine image you want to launch from Azure Marketplace.
Selecting the KUSANAGI 9 Virtual Machine Image
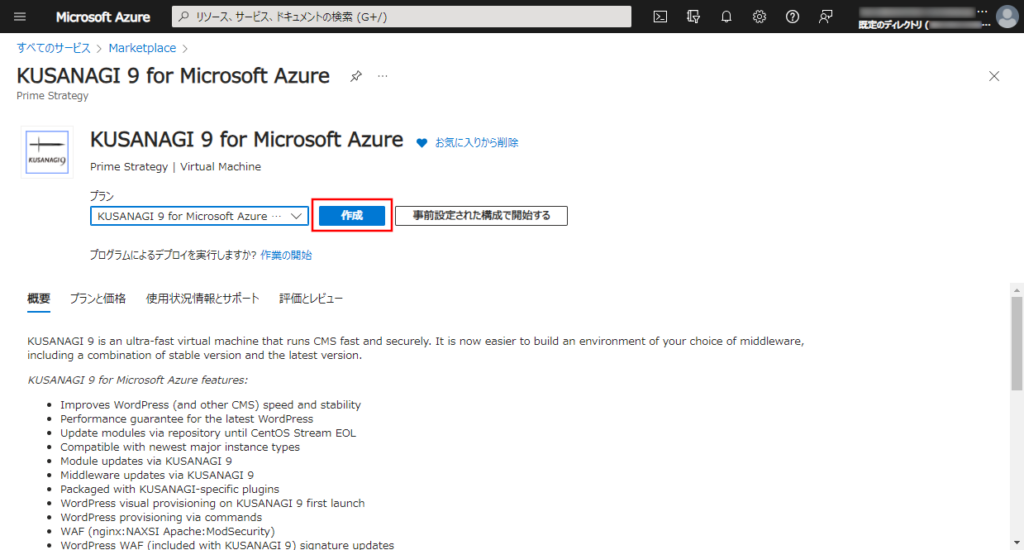
The KUSANAGI 9 for Microsoft Azure virtual machine image is registered in "Marketplace".
First, we will explain how to select the KUSANAGI 9 for Microsoft Azure virtual machine image from Marketplace.
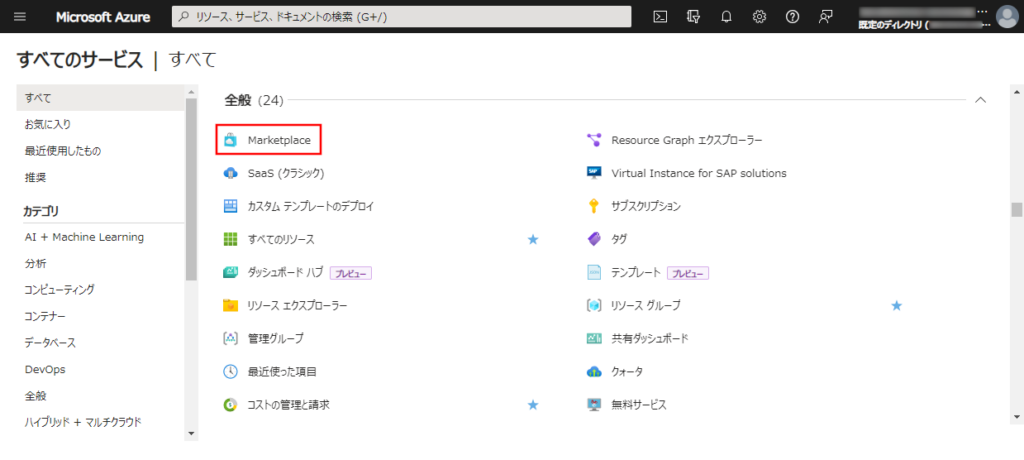
From the Microsoft Azure portal screen, click on "Other Services".

All services will be displayed, so click on "Marketplace".
Enter "kusanagi" in the search field and search.
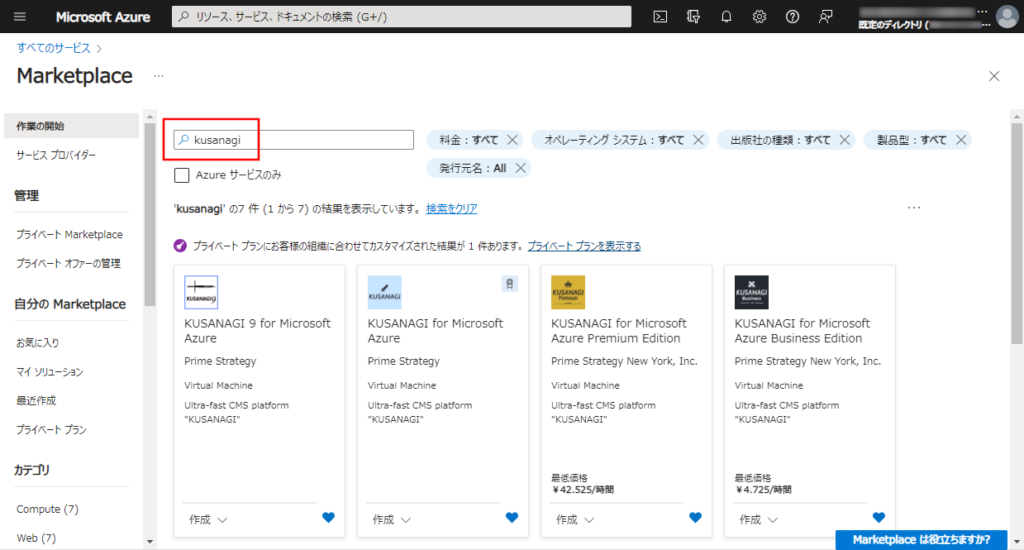
Click "KUSANAGI 9 for Microsoft Azure" in the search results.

If you would like to use the Business Edition or the Premium Edition, please see below.
| Edition | Service |
|---|---|
| Free Version | KUSANAGI 9 for Microsoft Azure |
| Business Edition | KUSANAGI 9 for Microsoft Azure Business Edition |
| Premium Edition | KUSANAGI 9 for Microsoft Azure Premium Edition |
The details of "KUSANAGI 9 for Microsoft Azure" will be displayed, so select your plan.
On this page, select "KUSANAGI 9 for Microsoft Azure on AlmaLinux OS 8" and proceed.
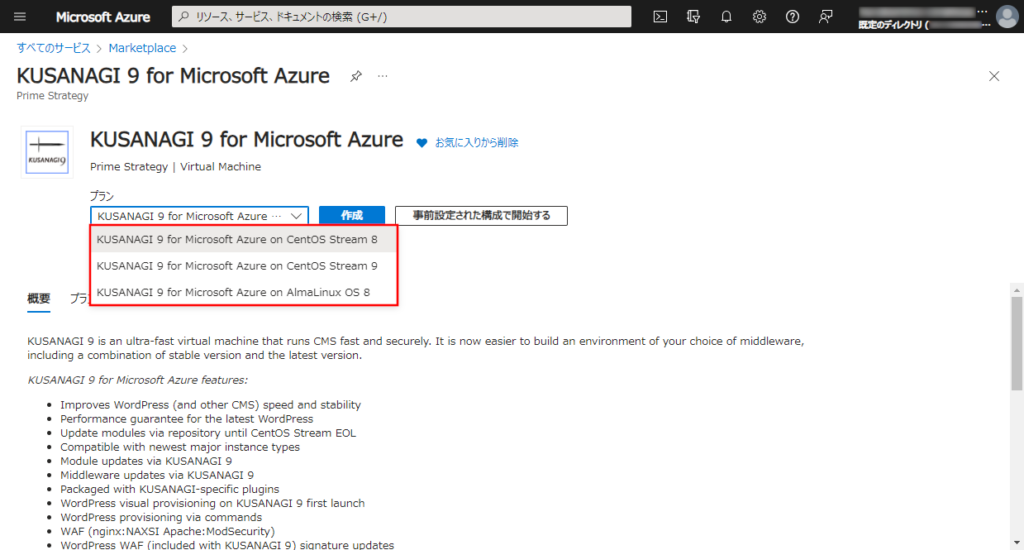
If you would like to use the Business Edition or the Premium Edition or another OS, please refer to the chart below.
| Edition | OS | Plan |
|---|---|---|
| Free Version | AlmaLinux OS 8 | KUSANAGI 9 for Microsoft Azure on AlmaLinux OS 8 |
| AlmaLinux OS 9 | KUSANAGI 9 for Microsoft Azure on AlmaLinux OS 9 | |
| CentOS Stream 8 | KUSANAGI 9 for Microsoft Azure on CentOS Stream 8 | |
| CentOS Stream 9 | KUSANAGI 9 for Microsoft Azure on CentOS Stream 9 | |
| Business Edition | AlmaLinux OS 8 | KUSANAGI 9 for Microsoft Azure Business Edition (AlmaLinux OS 8) |
| AlmaLinux OS 9 | KUSANAGI 9 for Microsoft Azure Business Edition (AlmaLinux OS 9) | |
| CentOS Stream 8 | KUSANAGI 9 for Microsoft Azure Business Edition (CentOS Stream 8) | |
| CentOS Stream 9 | KUSANAGI 9 for Microsoft Azure Business Edition (CentOS Stream 9) | |
| Premium Edition | AlmaLinux OS 8 | KUSANAGI 9 for Microsoft Azure Premium Edition (AlmaLinux OS 8) |
| AlmaLinux OS 9 | KUSANAGI 9 for Microsoft Azure Premium Edition (AlmaLinux OS 9) | |
| CentOS Stream 8 | KUSANAGI 9 for Microsoft Azure Premium Edition (CentOS Stream 8) |
Click the "Create" button.
Create a Virtual Machine
Create and start a virtual machine from the selected virtual machine image and get it ready for login.
Basic Settings
The "VM Creation - Basic Settings" screen will appear.
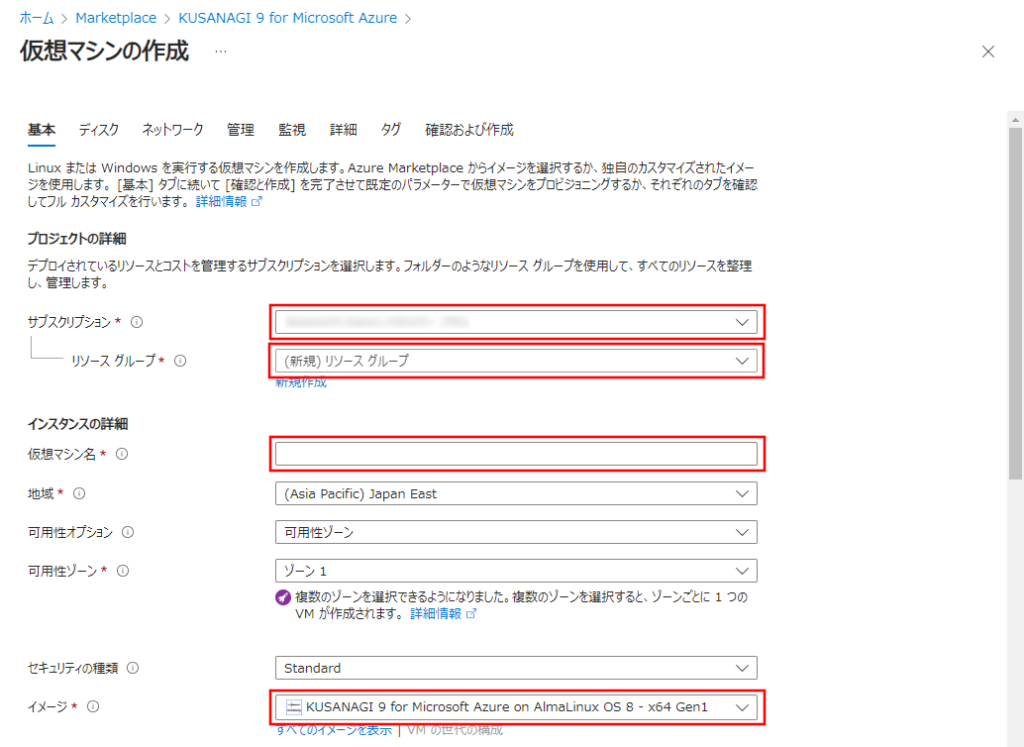

- Subscription: Select a subscription.
- Resource Group: Select a resource group. If none exists, you can create a new one.
- VM Name: Enter the virtual machine name.
- VM Image: Varies depending on the service and plan selected. Please make sure that the image for the service and plan you want to use is selected.
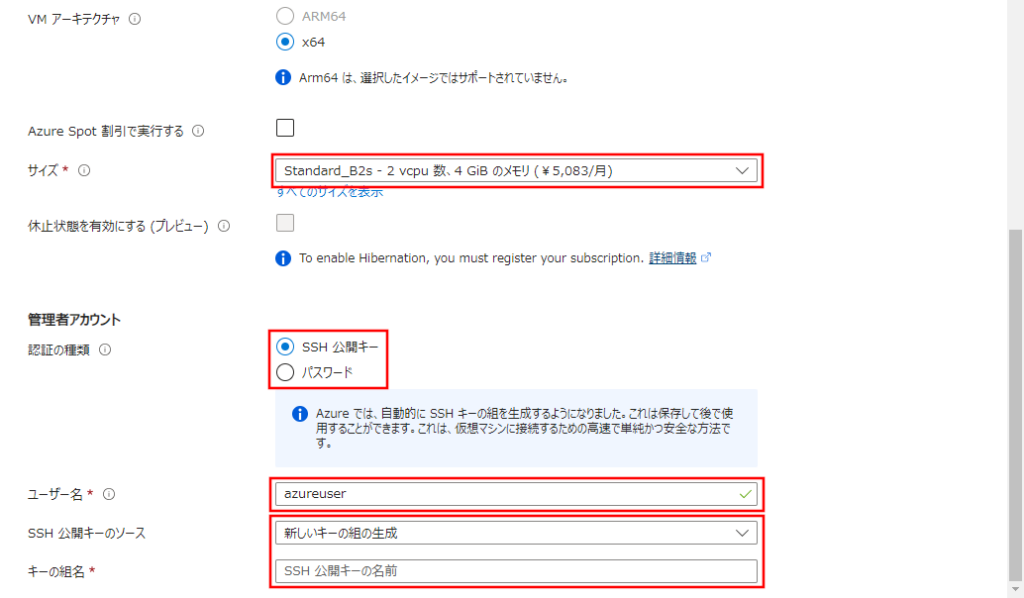
- Size: Select the instance size.
- KUSANAGI 9 for Microsoft Azure recommends a B2s instance or higher (memory of 4GB or more).
- Authentication Type: Select the type of authentication.
- SSH Public Key: Authenticate using an SSH Public Key. (We recommend the SSH method)
- Password: Authenticate using your password.
- Username: Enter your username.
- You will log into the virtual machine using the same username, so please make a note of it so you don't forget it.
- If the authentication type is an SSH public key
- SSH Public Key Source: You can choose to create a new one, use a public key already enabled in Azure, or use a locally existing public key.
- In the next field, enter the name of the key pair if it is new.
- If you created a new key, you will have to download the private key file later. You will need to use the downloaded private key to log into the virtual machine, so be careful not to delete it accidentally.
- If you use a public key that is already stored in Azure, select "Stored Public Key".
- If you use a locally existing public key, enter the public key value.
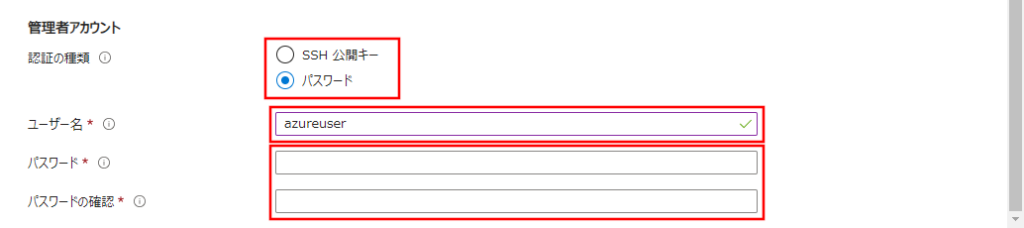
- If the authentication type is a password
- Password, Password Confirmation: Enter your password. Enter the same value.
- The password entered here will be used to log in to the virtual machine, so please make a note of it so you don't forget it.
- Password, Password Confirmation: Enter your password. Enter the same value.
When all entries are complete, click "Next: Disk >".
Disk
The "VM Creation - Disk" screen will appear.
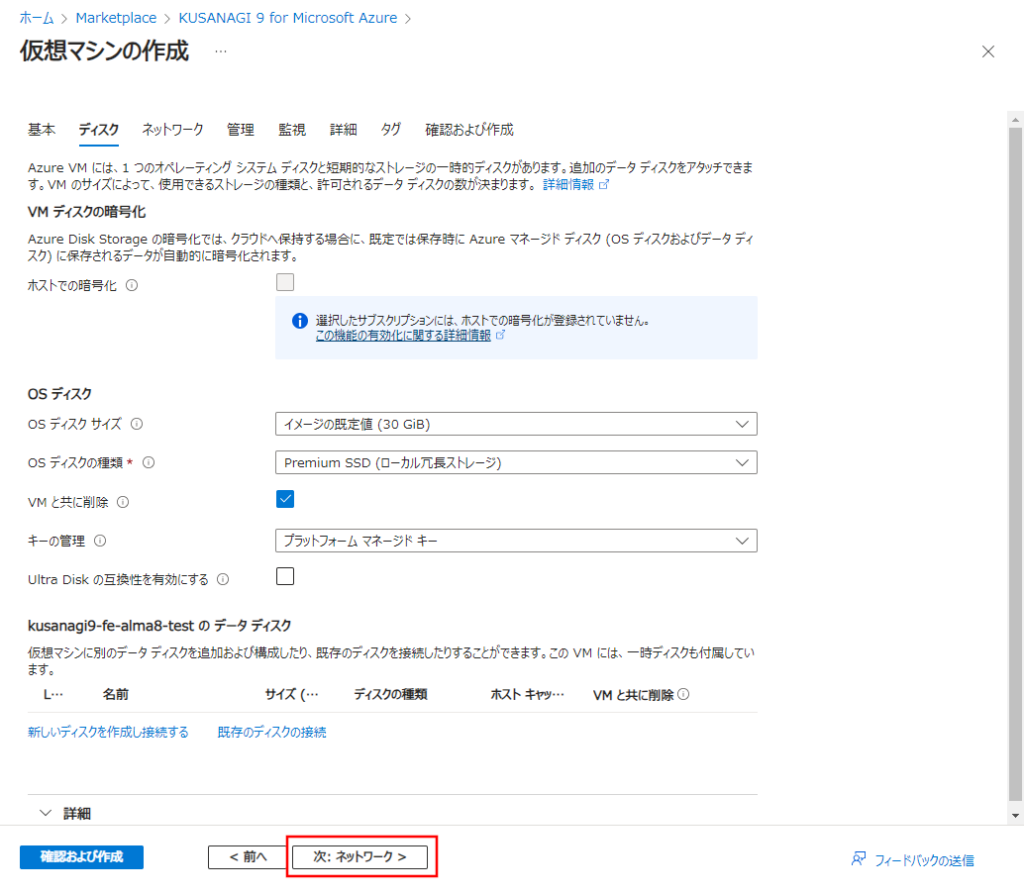
After confirming that all the information is correct, click "Next: Network >".
Network
The "VM Creation - Network" screen will appear.
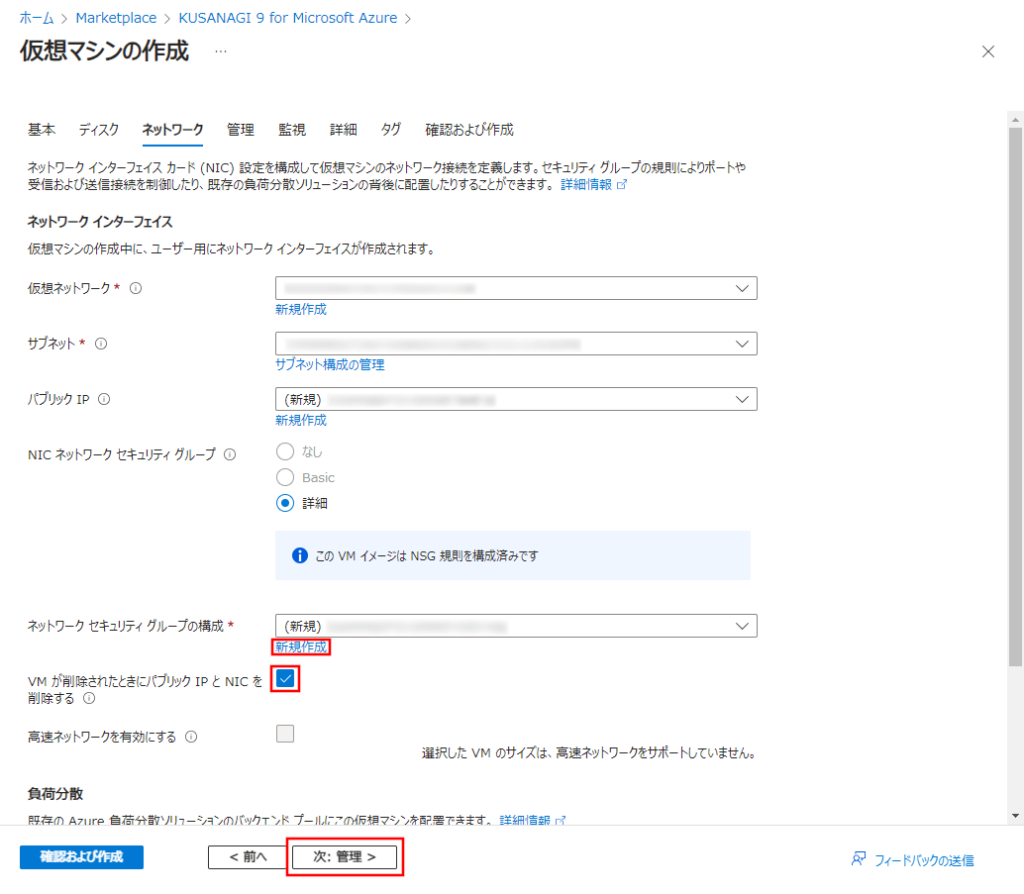
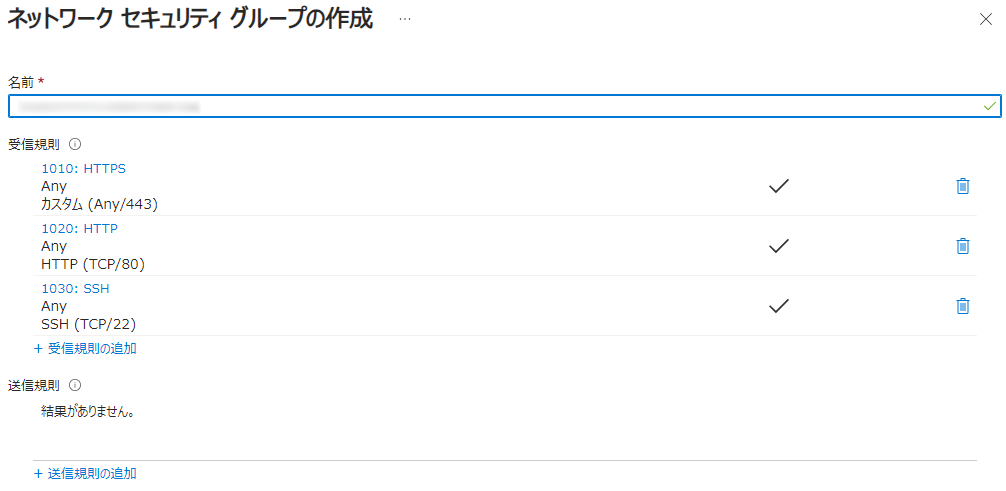
The "Network Security Group" provides control over incoming and outgoing protocol ports. KUSANAGI 9 for Microsoft Azure has the following ports open by default.
- Ports open for all services
- SSH(TCP : 22)
- HTTP(TCP : 80)
- HTTPS(TCP : 443)
- Ports open in KUSANAGI 9 for Microsoft Azure / KUSANAGI 9 for Microsoft Azure Business Edition / KUSANAGI 9 for Microsoft Azure Premium Edition
- HTTP/3(UDP : 443)
- Ports open in KUSANAGI 9 for Microsoft Azure Premium Edition
- WEXAL(TCP : 61000)
Depending on the security requirements, we recommend changing the settings to make them more secure, such as implementing IP restrictions.
The box "Remove public IP and NIC when VM is removed", is not checked by default. When deleting the VM, please check this box to specify that the public IP and NIC resources are to be deleted at the same time.
After confirming the information is correct, click "Next: Administration >".
Administration
The "VM Creation - Administration" screen will appear.
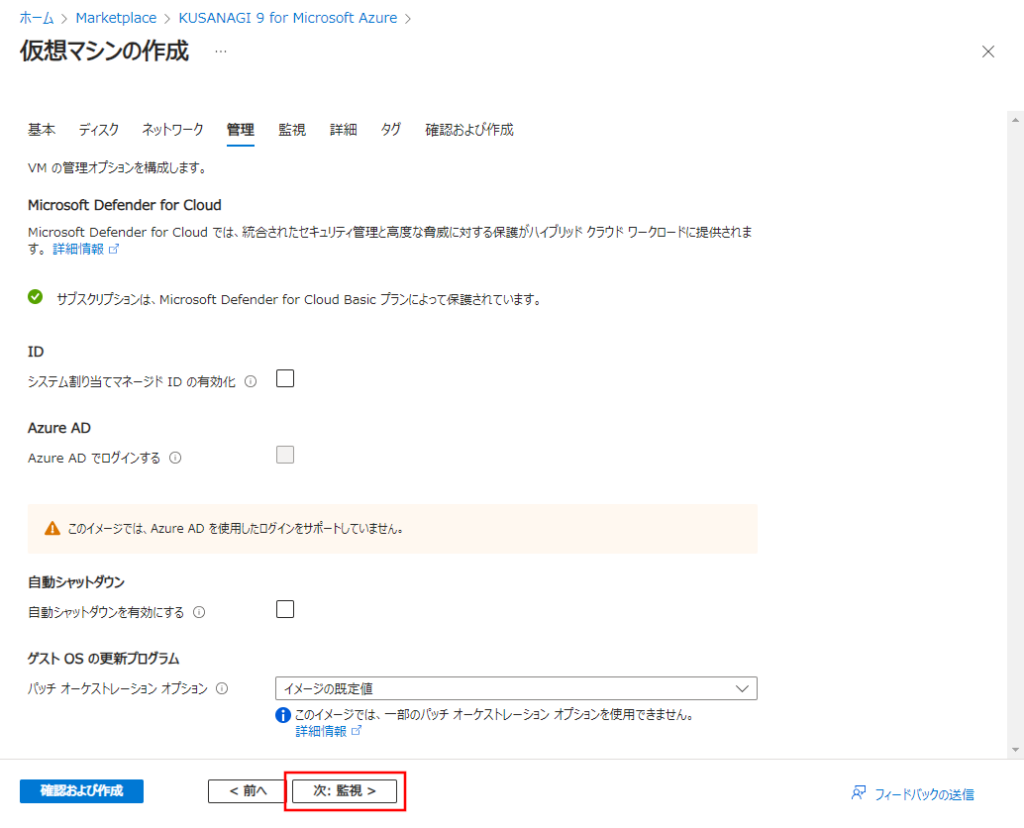
After confirming the information is correct, click "Next: Monitoring >".
Monitoring
The "VM Creation - Monitoring" screen will appear.
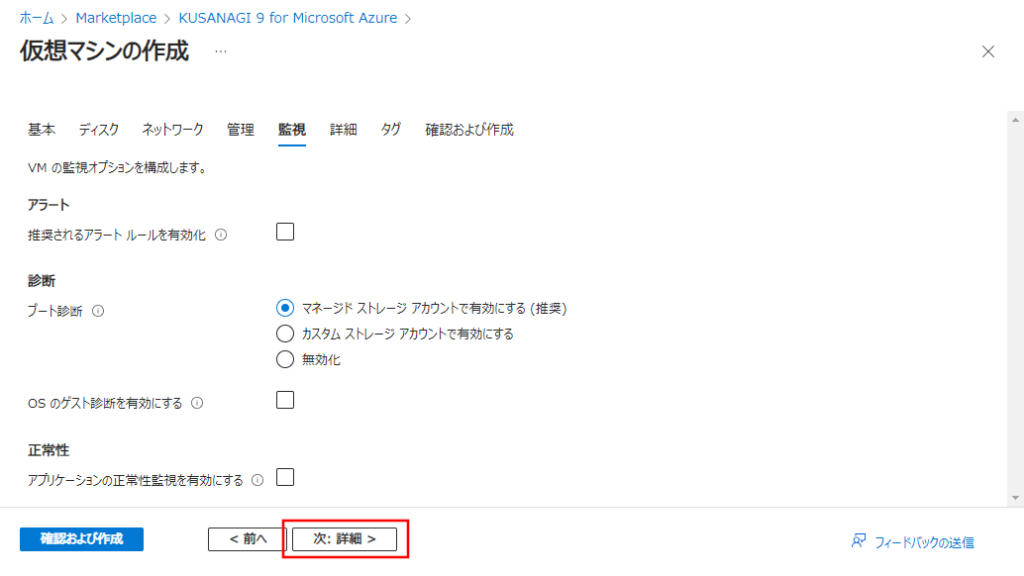
After confirming the information is correct, click "Next: Details >".
Details
The "VM Creation - Details" screen will appear.
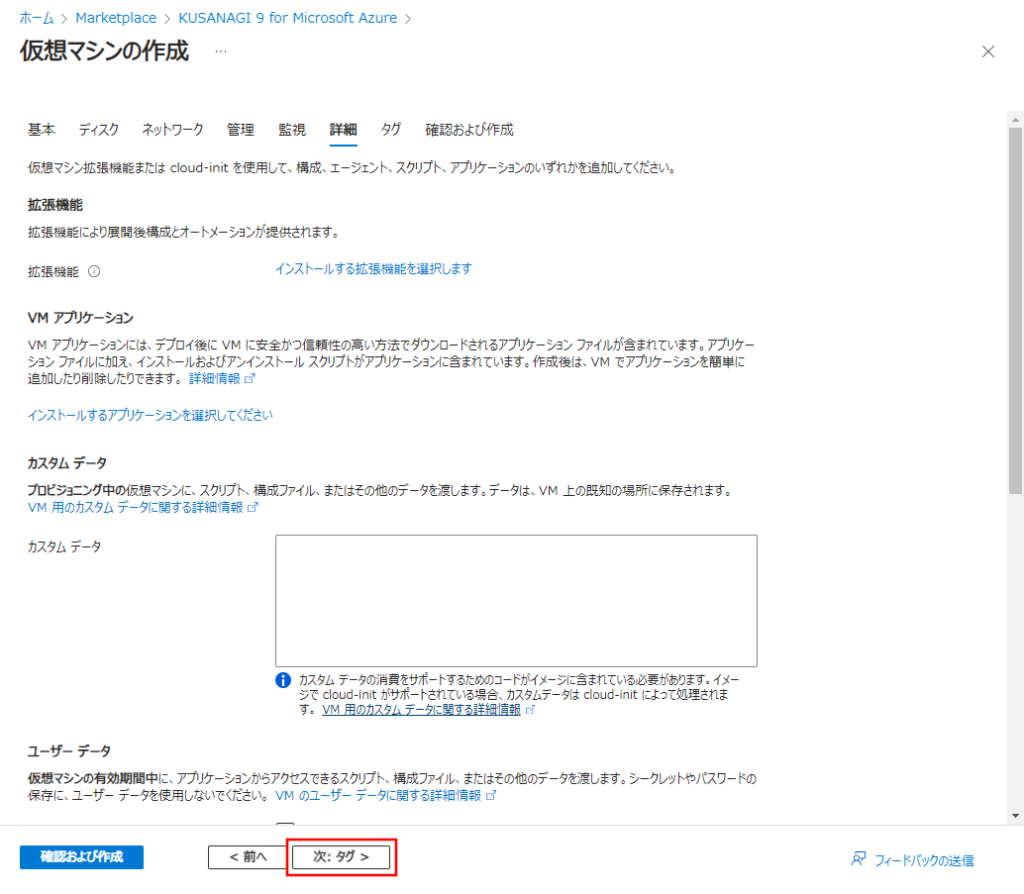
After confirming the information is correct, click "Next: Tags >".
Tags
The "VM Creation - Tags" screen will appear.

内容を確認しましたら「次: 確認および作成 > 」をクリックします。
Review and Create
The "VM Creation - Review and Create" screen will appear.
The cost and terms of use of the selected machine image or VM instance will be displayed here. The differences in cost are displayed below:
- The following is provided free of charge, so the cost of 0.0000 JPY/hour will appear in the cost column.
- KUSANAGI 9 for Microsoft Azure
- The following are provided for a fee, so a specified cost will appear in the cost column. The cost differs between the Business Edition and Premium Edition.
- KUSANAGI 9 for Microsoft Azure Business Edition
- KUSANAGI 9 for Microsoft Azure Premium Edition
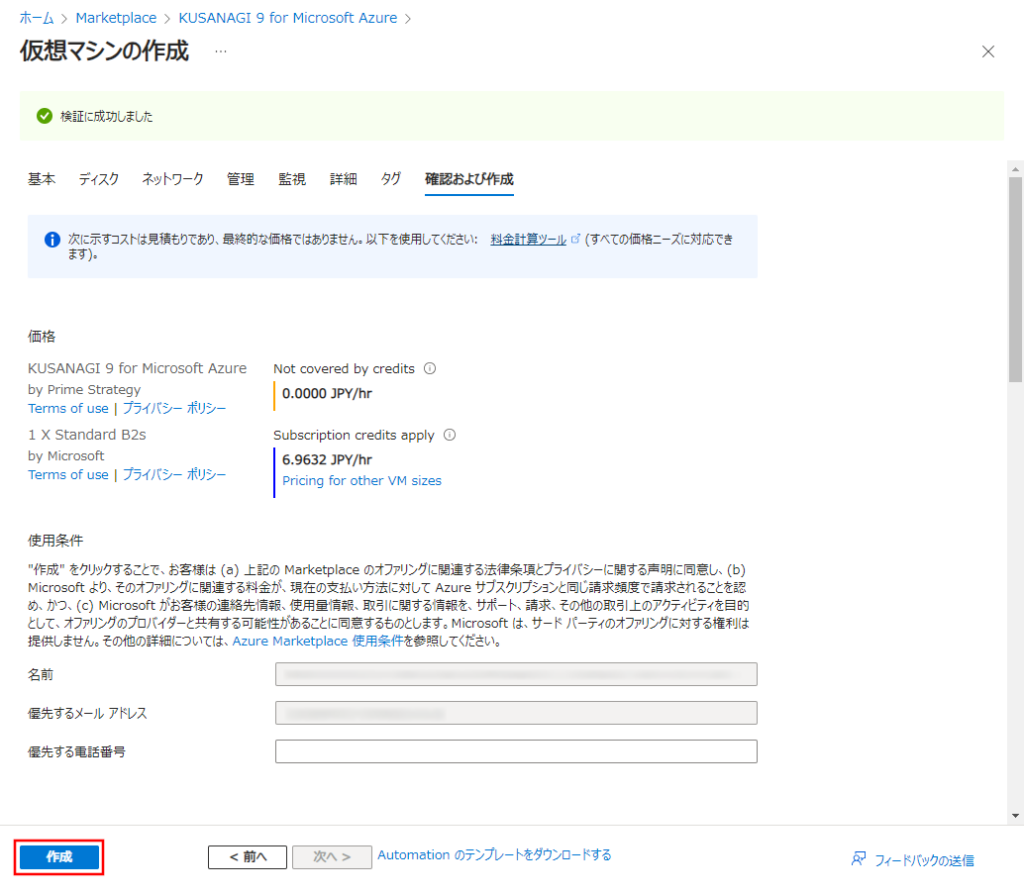
Review the information, if there are no problems click "Create". Then the deployment will begin.
Deploy the Virtual Machine
Deployment Complete
When the deployment is complete, the following screen will appear.
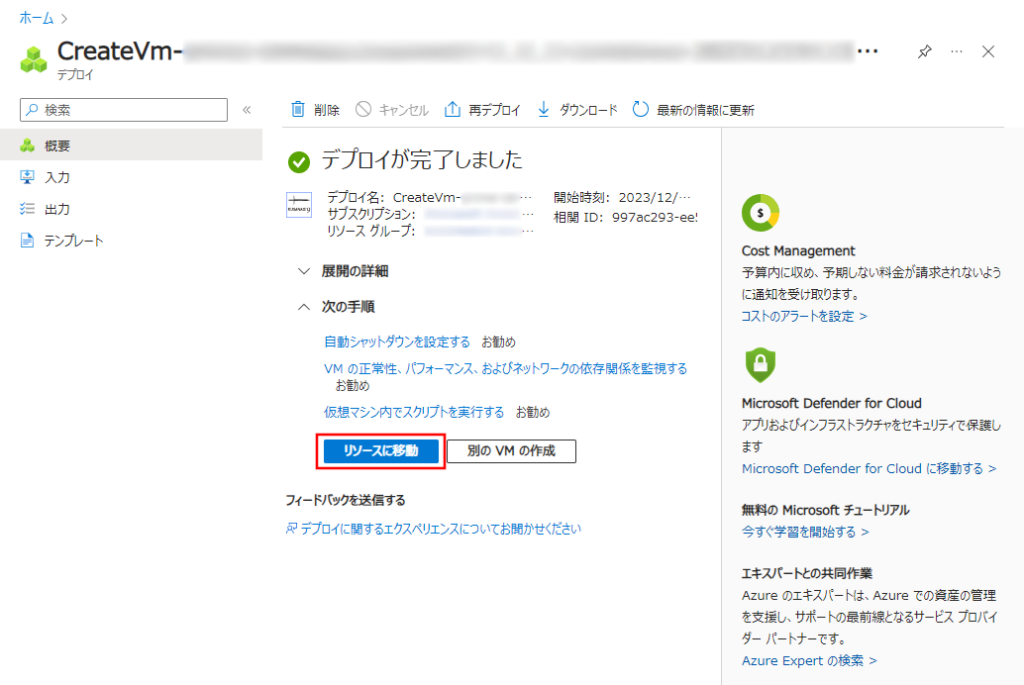
Click on "Open the Deployed VM" to go to the page for the virtual machine you created.
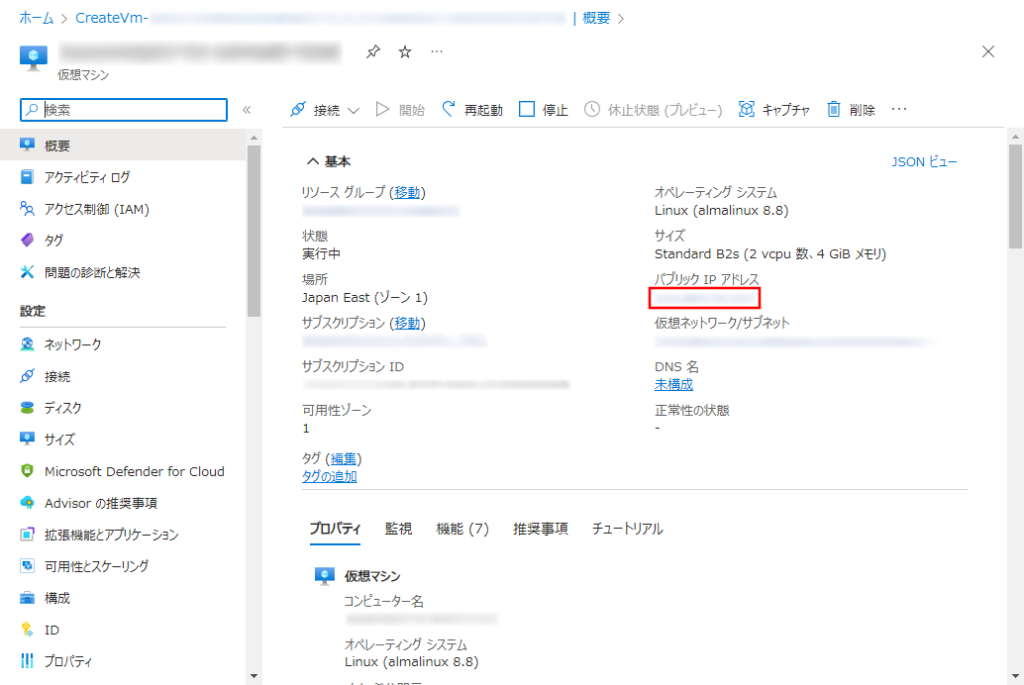
Checking the Deployment Results
The virtual machine settings are displayed on the resource screen.
On this screen, make a note of the "Public IP Address".
Log into the server using this public IP address, the user name you set up in "Create a Virtual Machine->Basic", and your private key or password.
Log In to the Virtual Machine and Prepare for Initial Setup
The following section describes how to prepare for logging in to the virtual machine and performing the initial setup.
Logging In to the Virtual Machine
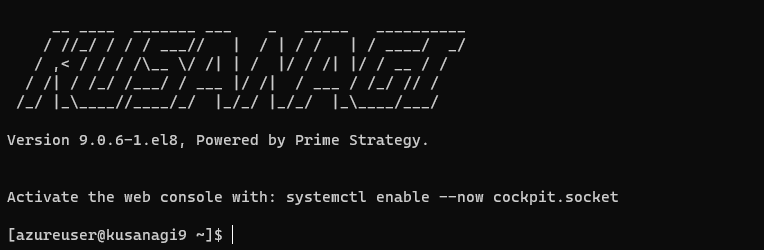
Log into the virtual machine using the "ssh" command.
The information you will need is the public IP address from "Virtual Machine - Deployment -> Deployment Results", and the user name set in "Create a Virtual Machine->Basic", and the locally stored secret key or password.
For private keys, please see the following.
# ssh (user name)@(public IP address) -i (full path to private key file)For passwords, please see the following.
# ssh (user name)@(public IP address)Next, you will be prompted for a password, so enter your password.
If you want to log in using an SSH client on Windows, please refer to the link below.
Log in to KUSANAGI 9 with Windows "ssh"
If the log-in is successful, you will see the following screen.
Switching to the "root" User
To switch to the "root" user, enter the following.
$ sudo su -Confirm that you have switched to the "root" user.
[root@<hostname> ~]#If it ends with #, the switch was made to the "root" user.
For further steps, please follow the instructions below.
If you are using KUSANAGI 9 for Microsoft Azure, please refer to the link below.
KUSANAGI 9 Quick Start
If you are using KUSANAGI 9 for Microsoft Azure Business Edition or KUSANAGI 9 for Microsoft Azure Premium Edition, please refer to the link below.
Web Setup for KUSANAGI 9 Business Edition and Premium Edition
- Microsoft and Azure are either registered trademarks or trademarks of Microsoft Corporation in the United States and/or other countries.

