
When you enable the KUSANAGI AI Assist MCP connection, you can view the status of KUSANAGI and WordPress from Claude Desktop, Claude Code, Codex, or a general-purpose MCP client. You can use this independently of the feature that generates AI advice in the WordPress administration screen.
For supported editions and diagnostic features, see Configuring and Using the KUSANAGI AI Assist Plugin.
What You Can Do with an MCP Connection
KUSANAGI exposes its registered read-only Abilities and the read-only features exposed by the WordPress Core Abilities API to external AI clients as MCP tools. For example, you can ask an AI assistant to “check the status of this WordPress site” and review the KUSANAGI operating status, WordPress environment information, plugin status, and diagnostic results together.
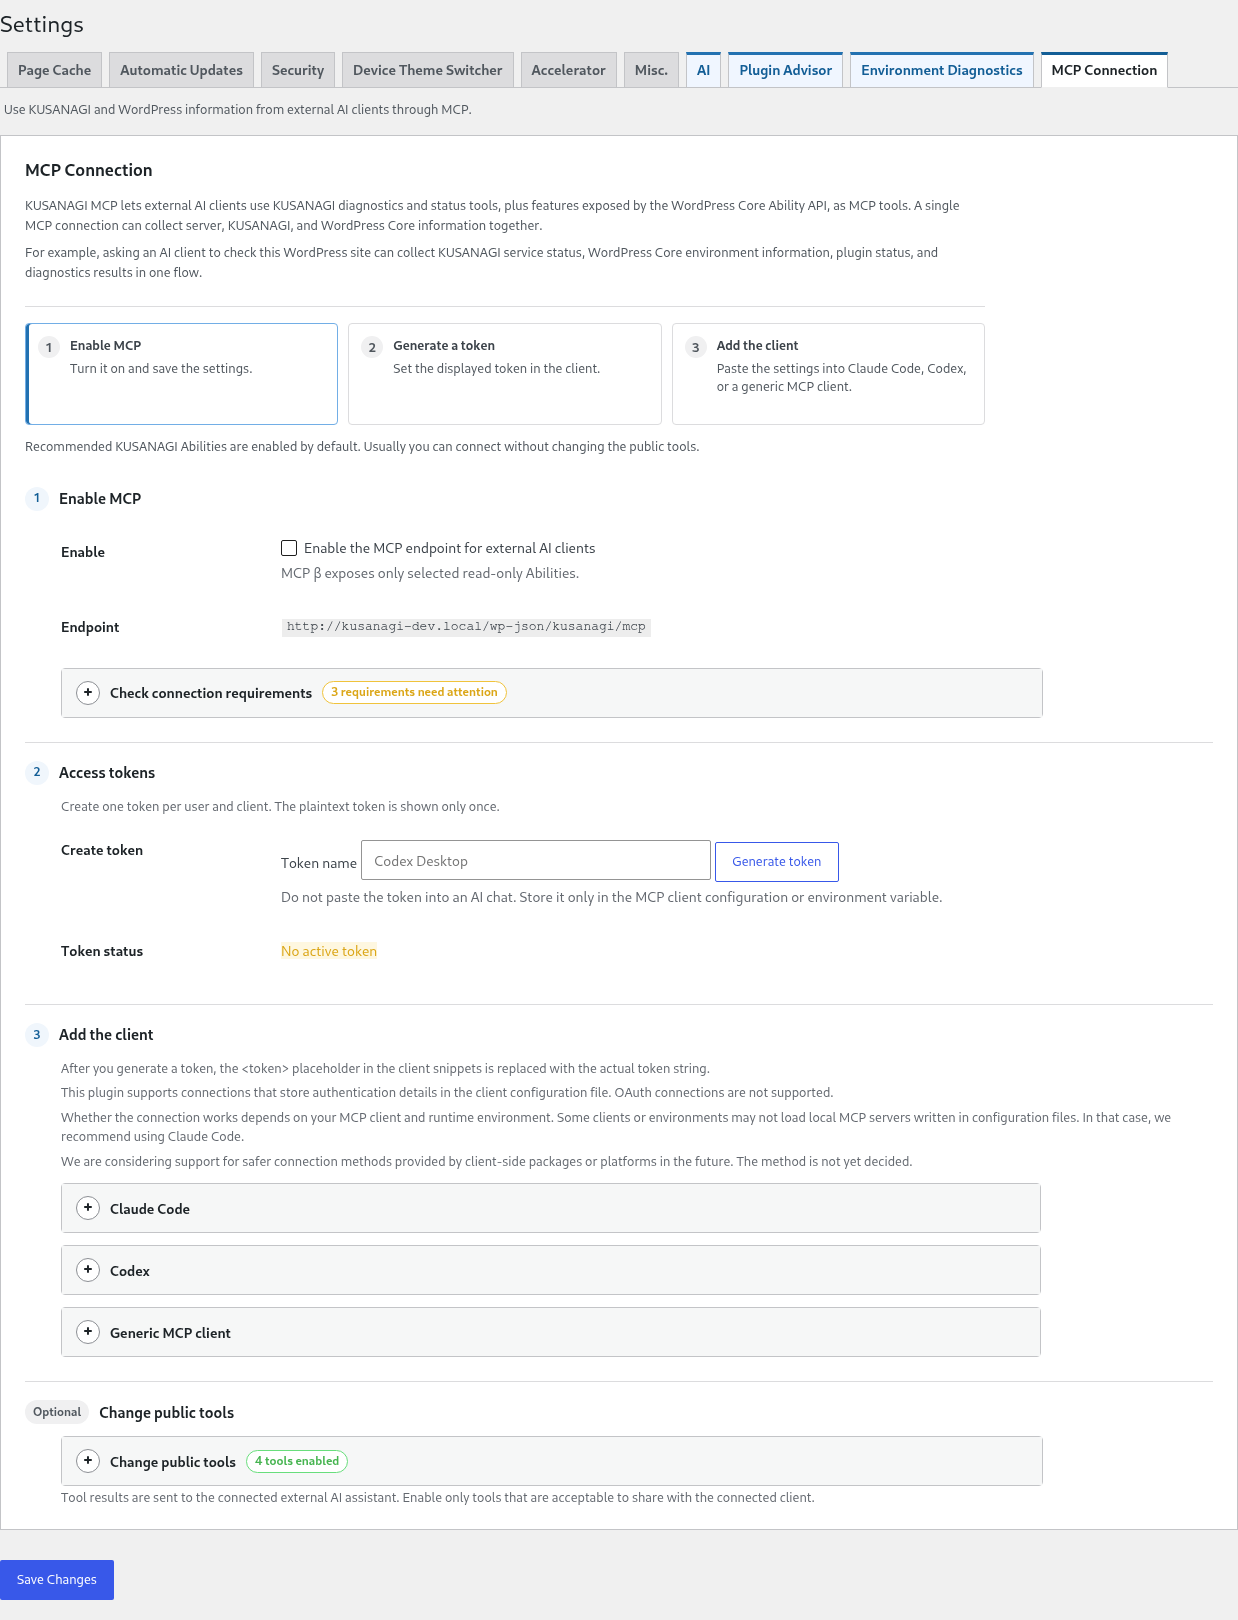
Connection Process
- Enable MCP.
- Generate an access token for the user and client that will connect.
- Add the configuration to Claude Desktop, Claude Code, Codex, or a general-purpose MCP client.
- Change the exposed tools if necessary.
Enabling MCP
- Open “Settings” under “KUSANAGI” in the WordPress administration screen.
- Open the “MCP Connection” tab.
- Select “Enable the MCP endpoint for external AI clients.”
- Select “Save Changes.”
HTTPS is required in a production environment. Open “Check Connection Requirements” and verify the following conditions.
- The MCP Adapter can be loaded.
- The MCP endpoint is enabled.
- The site URL uses HTTPS or a local validation host.
- An access token has been generated.
- At least one exposed tool is enabled.
Generating an Access Token
- In “Token Name,” enter a name that identifies the client.
- Select “Generate Token.”
- Save the token, which is displayed only once, in the client configuration or an environment variable.
Do not paste the token into an AI chat. Create a dedicated token for each user and client. Revoke or delete tokens that are no longer needed.
Adding KUSANAGI to a Client
After you generate a token, “Add to Client” in the administration screen displays configuration examples containing the actual endpoint and token.
Claude Desktop
- Open “Settings” in Claude Desktop.
- Open “Developer,” then select “Edit Config” for the local MCP server.
- In the opened
claude_desktop_config.json, add the KUSANAGI configuration undermcpServers. - Save the file and restart Claude Desktop.
- Check the connection status under “Developer.” You can also open “Connectors” from the “+” button in the chat input to view the available tools.
{
  "mcpServers": {
    "kusanagi": {
      "command": "npx",
      "args": [
        "-y",
        "mcp-remote",
        "<endpoint>",
        "--header",
        "Authorization:${AUTH_HEADER}"
      ],
      "env": {
        "AUTH_HEADER": "Bearer <token>"
      }
    }
  }
}
This configuration connects to the KUSANAGI remote HTTP MCP server through the locally running mcp-remote. Make sure Node.js 18 or later and npx are available first. Do not insert a space after the colon in Authorization:${AUTH_HEADER}. Separating the entire Bearer token into an environment variable also handles cases where spaces in arguments are not processed correctly by Claude Desktop for Windows.
If claude_desktop_config.json already contains configuration, do not replace the entire file. Add kusanagi under the existing mcpServers. After saving, quit Claude Desktop completely and restart it. mcp-remote is a third-party package. Review its publisher and contents before use.
KUSANAGI uses Bearer token authentication. Claude “custom connectors” cannot set an arbitrary Authorization header and generally require OAuth. Therefore, the current KUSANAGI MCP connection uses a local MCP server configuration.
Claude Code
Run the command displayed in the administration screen from the target project directory. The format is as follows.
claude mcp add --transport http kusanagi <endpoint> --header "Authorization: Bearer <token>"Codex
Add the MCP server to the Codex config.toml, set the token in the KUSANAGI_MCP_TOKEN environment variable, and restart Codex.
[mcp_servers.kusanagi]
url = "<endpoint>"
bearer_token_env_var = "KUSANAGI_MCP_TOKEN"
General-Purpose MCP Clients
Add the JSON configuration example displayed in the administration screen to the client configuration. Use the Authorization: Bearer <token> format for the authentication header.
Reviewing Exposed Tools
The recommended KUSANAGI tools are selected by default. You can normally connect without changing this selection.
| Tool | Information returned |
|---|---|
kusanagi/status | Operating status of KUSANAGI services |
kusanagi/analyze | Environment diagnostic results |
kusanagi/check-results | Plugin diagnostic results |
kusanagi/installed-plugins | Names, slugs, versions, and activation status of installed plugins |
Under “Change Exposed Tools,” you can also select additional read-only Abilities provided by WordPress Core. Tool results are sent to the connected external AI assistant. Enable only tools that return information you are permitted to send.
Troubleshooting Connections
- Verify that the endpoint URL matches the value displayed in the administration screen.
- Verify that the authentication header uses the
Authorization: Bearer <token>format. - Check the token for missing characters, line breaks, or extra spaces.
- Verify that the token has not been revoked or deleted.
- Restart the MCP client after changing its configuration.
- Verify that the client supports remote HTTP MCP servers.
If 401 or rest_forbidden appears, check the endpoint and Bearer token in particular. MCP client specifications may change. Refer to the latest documentation for the client when configuring it.
Authentication information is currently stored in the client configuration. OAuth connections are not supported.


